
The Kubock Guide
Everything you need to start making things in Kubock — the modes, the shortcuts and the tricks that make a production flow.
The basics before anything else — what Kubock is, how it is organised around projects, and the couple of choices worth making up front so the rest of the app opens the way you like it.
Introduction
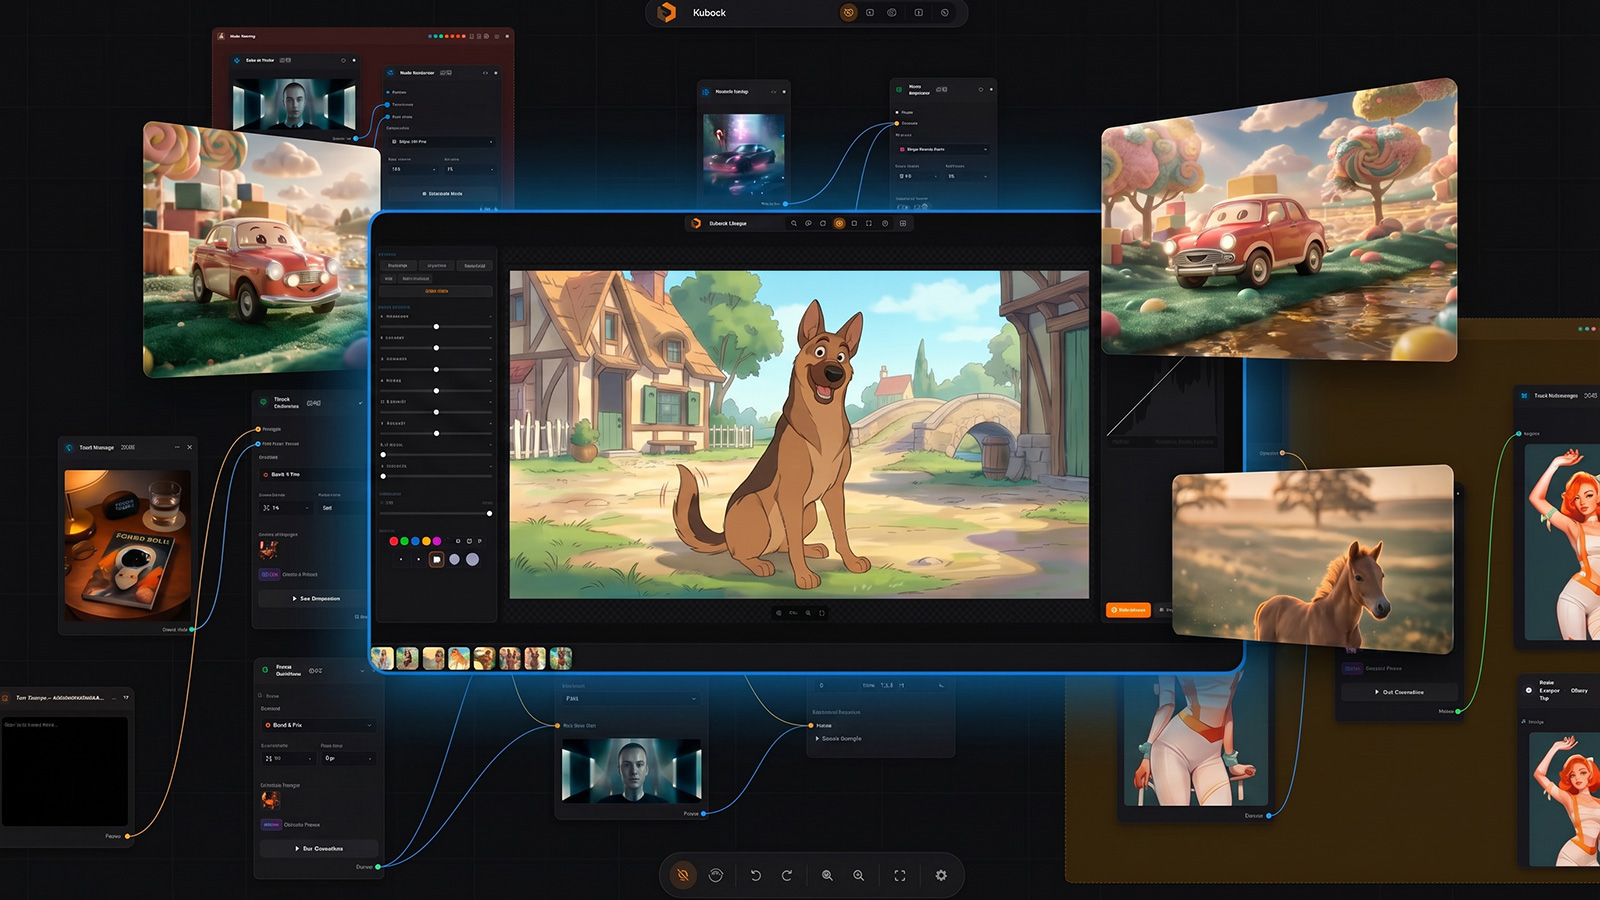
Kubock is an AI studio for filmmakers, showrunners and animators. You write, concept, storyboard, edit and export — all in one place. It is designed around production, not one-off prompts.
This guide will walk you through every mode and every trick.
If you only read one section, read Project-based thinking — it is the one decision that shapes everything else.
Bring your own keys
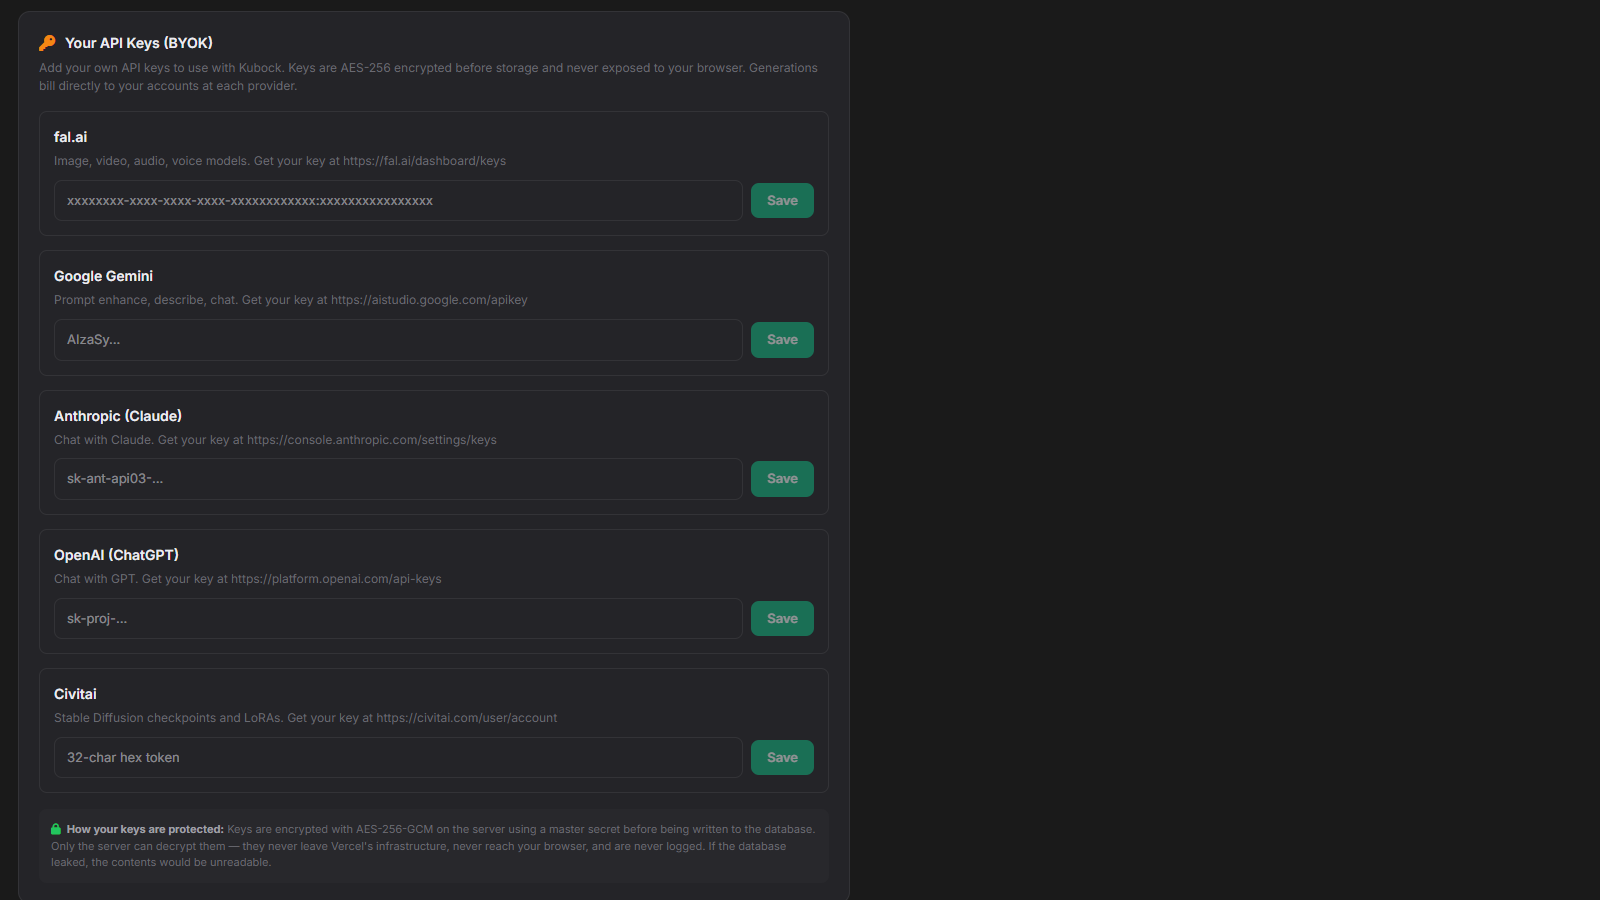
Kubock is built around BYOK — Bring Your Own Keys. You plug your own API keys into Profile (fal.ai, Civitai, OpenAI, Anthropic, Gemini — ElevenLabs voices run through your fal.ai key) and generations bill directly to your providers, at their rates, no markup.
Keys are AES-256 encrypted before they ever reach the database.
You can add keys on the Profile page. Kubock tells you exactly which features each key unlocks.
Mature content (NSFW) toggle
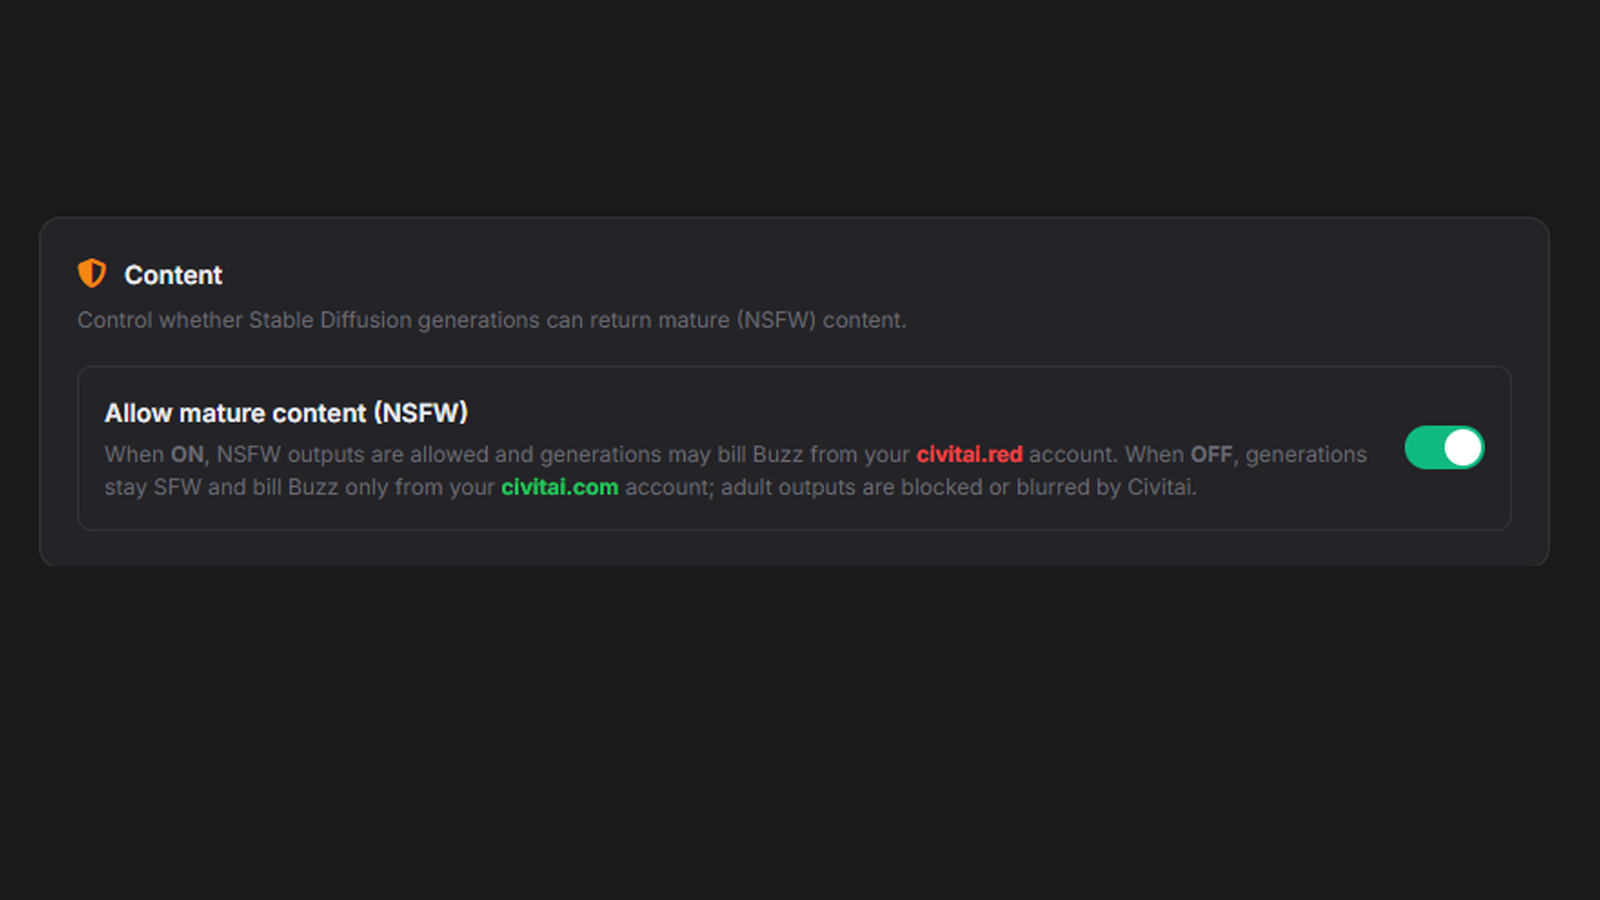
Civitai bills through two different accounts depending on the content rating, and Kubock lets you choose which one you are spending from. Scroll down in Profile to the Content section:
- OFF (default) — generations stay SFW and bill Buzz from your civitai.com account. Adult outputs are blocked or blurred by Civitai.
- ON — NSFW outputs are allowed and generations may bill Buzz from your civitai.red account.
The toggle only affects Stable Diffusion (Civitai) generations. Flux, Seedream, Nano Banana and every non-SD model are unaffected.
Want the full picture? Read What is BYOK, and why it matters for AI filmmaking tools.
Project-based thinking
Most AI tools give you a shelf of models and a rolling feed of generations. Prompt, result, scroll, forget. That works for a single shot. It falls apart the moment you try to make something that takes more than an afternoon.
Kubock is the opposite. Everything lives inside a project. A project has as many canvases as you want — one per sequence, one per character study, one per mood board — and those canvases share a library, an asset pool and a cast of aliased characters.
Why this matters:
- Design a character once. Reference it by name across every canvas.
- A screenplay loaded in Script mode feeds shot lists into the canvas.
- Two weeks later the project remembers what you decided.
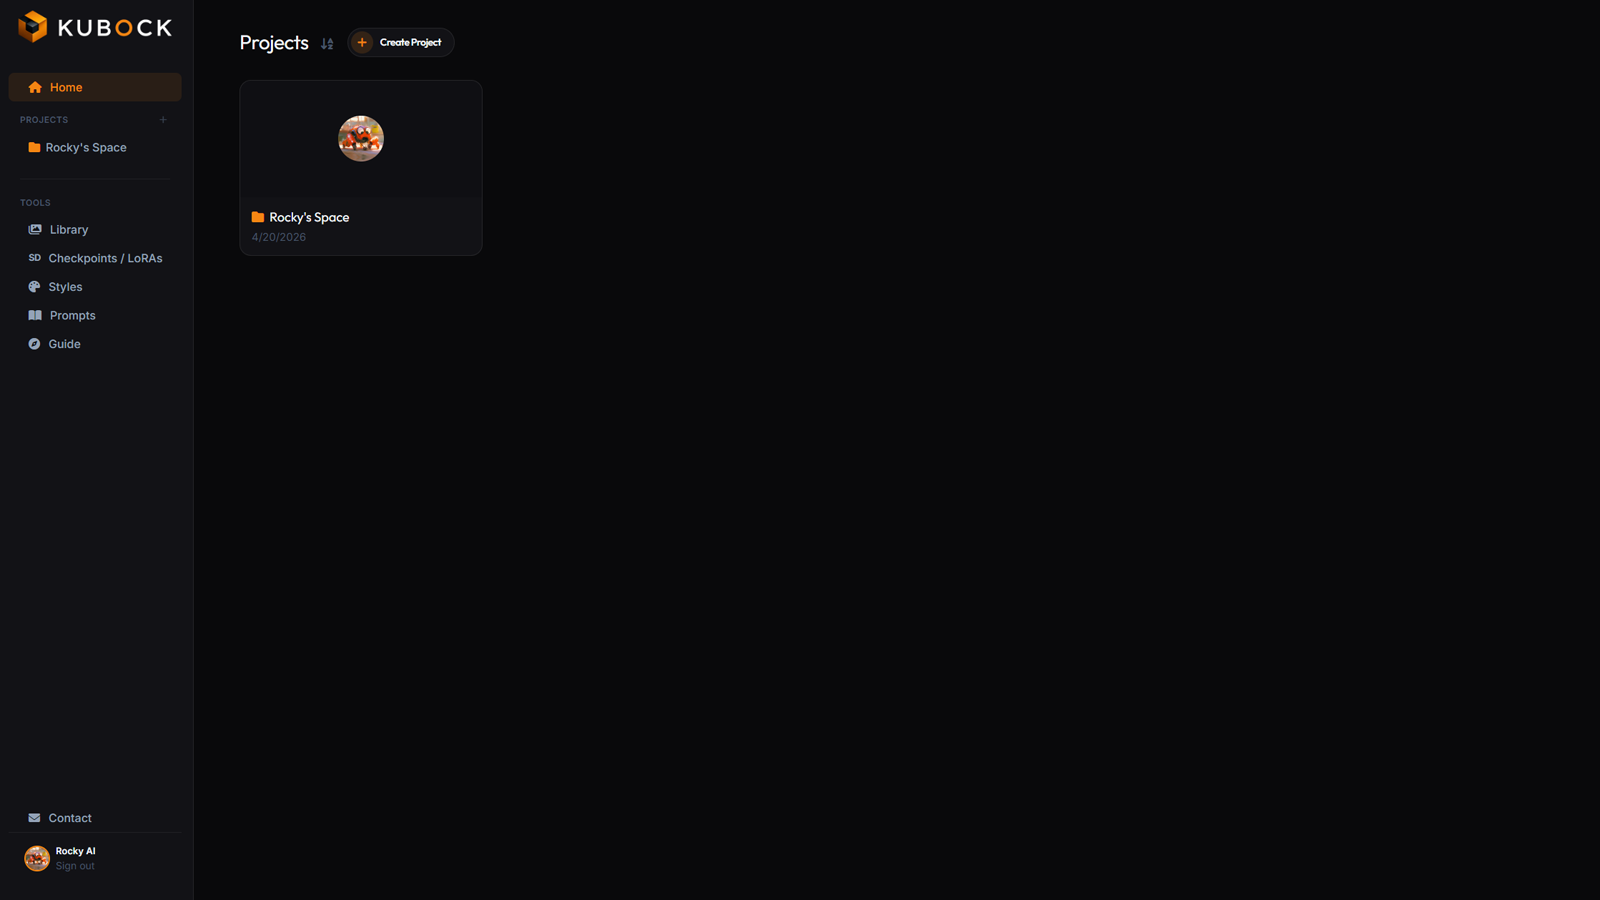
On the landing page, every card is a project. Click one to open it and see the canvases inside.
Your first canvas
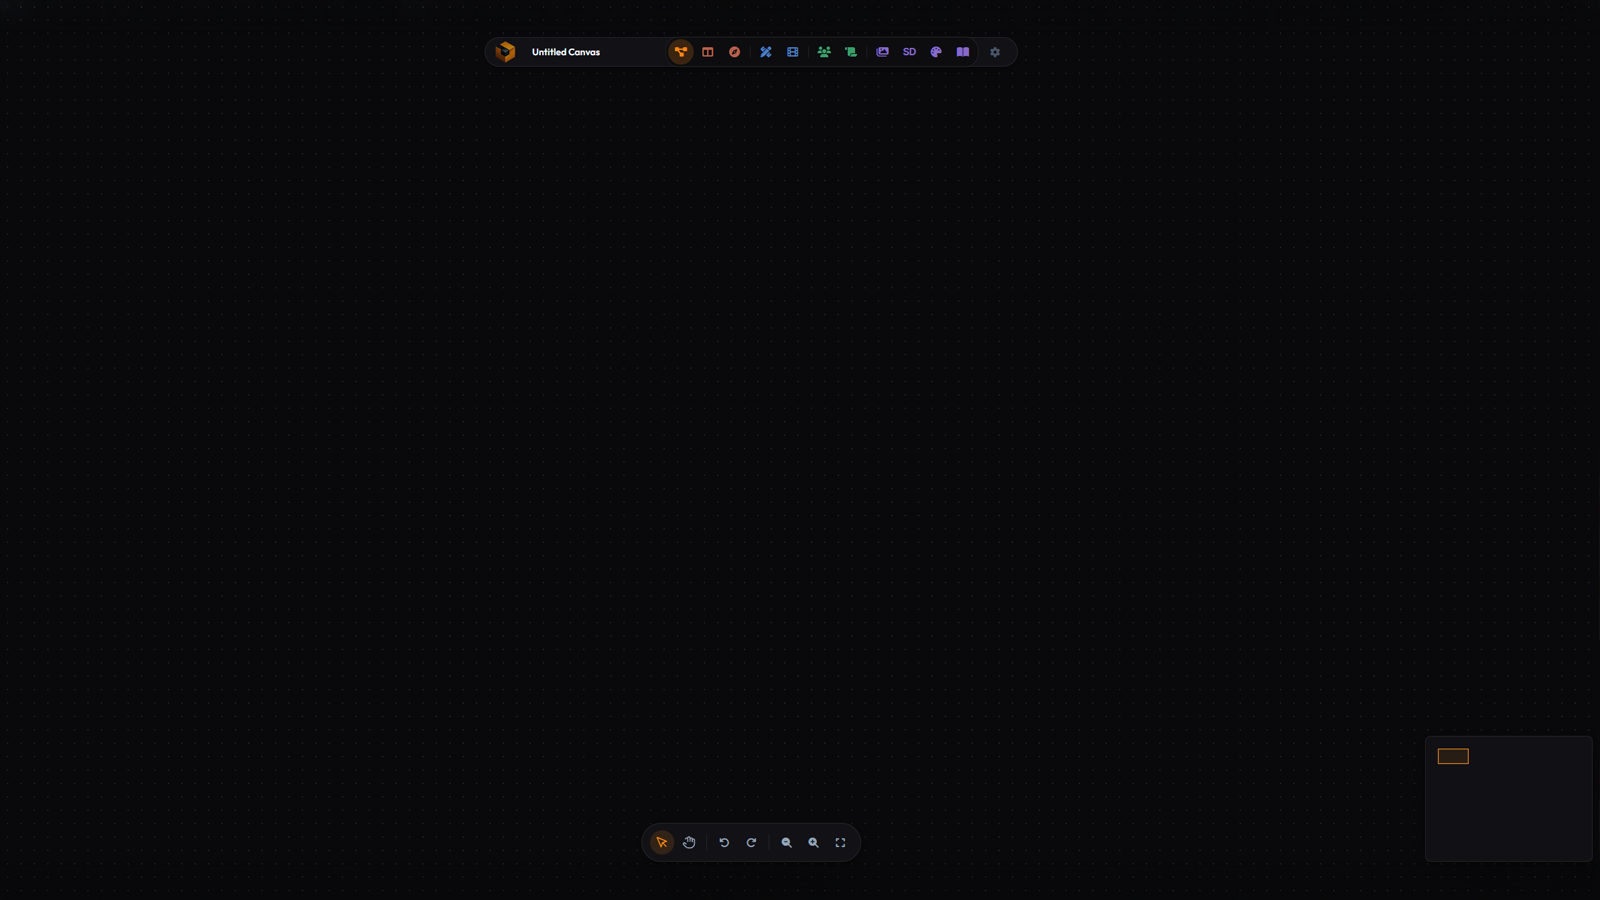
Once you are inside a project, hit New Canvas and you land in an empty infinite canvas in Node mode. From here, every mode is one key away.
Three ways to place a node:
- Right-click anywhere on the canvas and pick from the context menu.
- Press a number key over the canvas: 1 text, 2 upload, 3 image generate, 4 video, 5 audio, 6 3D model, 7 upscale, 8 describe, 9 AI Assistant.
- Drag an asset from the Library panel straight onto the canvas.
Pick a favourite model
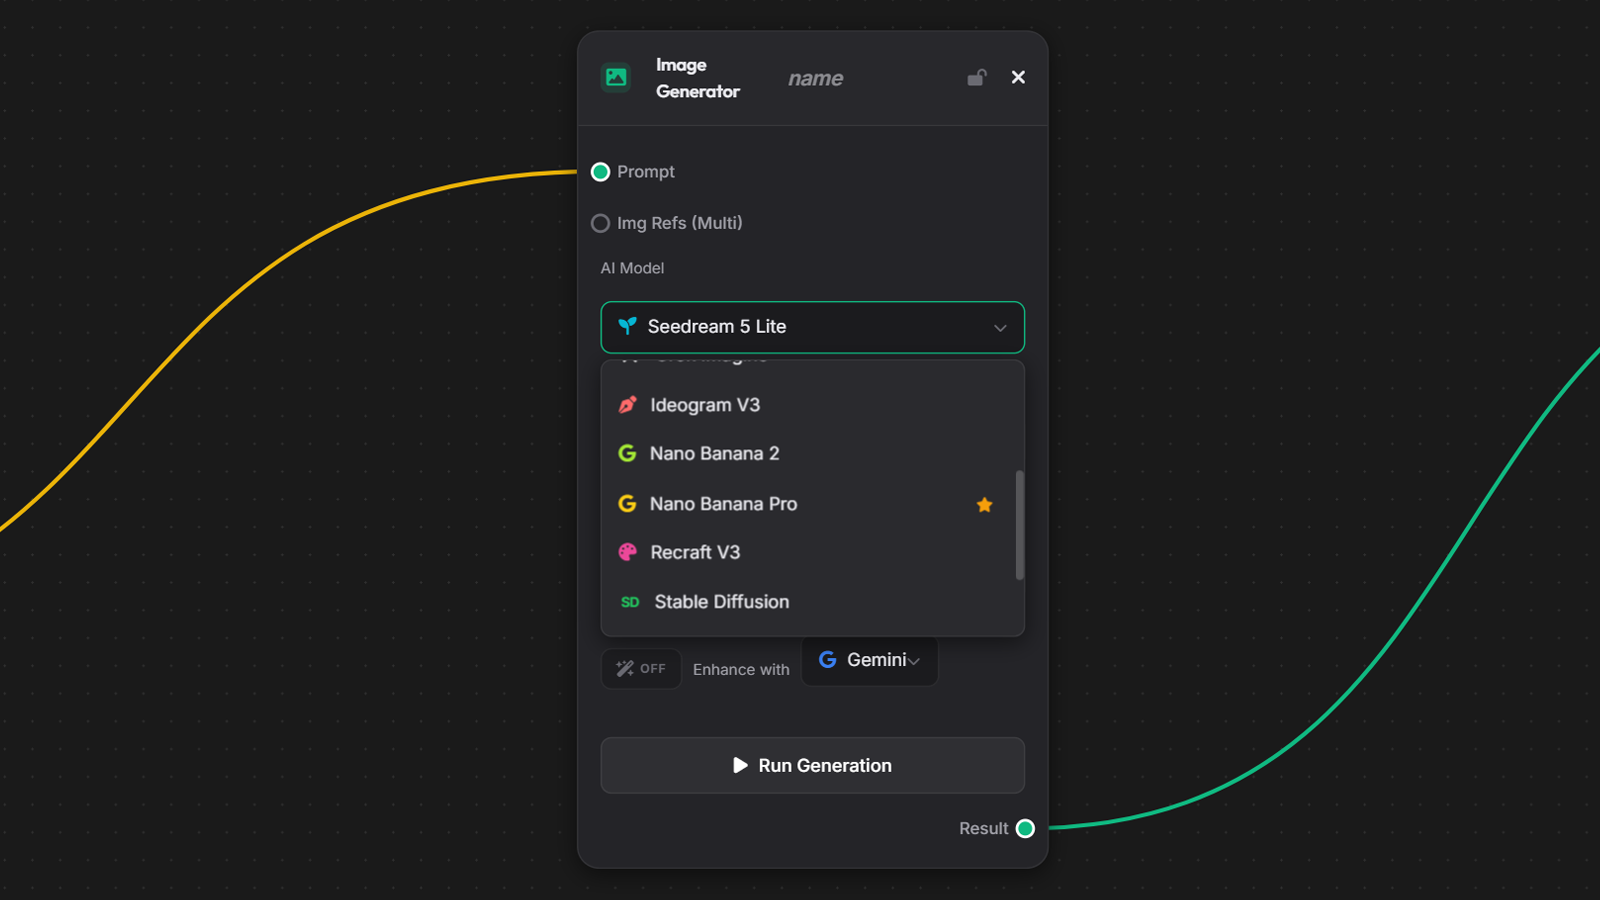
Kubock ships with 20+ image and video models. You probably use two of them 90% of the time. Every model list — image, video, audio, voice, 3D — has a little star on the right, and so do the aspect ratio and resolution pickers.
Click it and that model becomes your favourite: the one that opens by default whenever you create a new Generate node, or the one Swift boots into. Only one favourite per category. Click again to unset.
Your favourites are stored in the browser, so they are per device — set them once on each machine you work from.
A mode is a different way of working the same project — you flip between them with Shift+F1–F8 and never leave your work behind. There are seven: the Node mode where most of the building happens, Swift for fast look-hunting, Split to keep both on one screen, Script to turn a screenplay into shots, the Image Editor, Rough Cut for timing, and Stage for 3D previs. Here is what each one is for.
Node
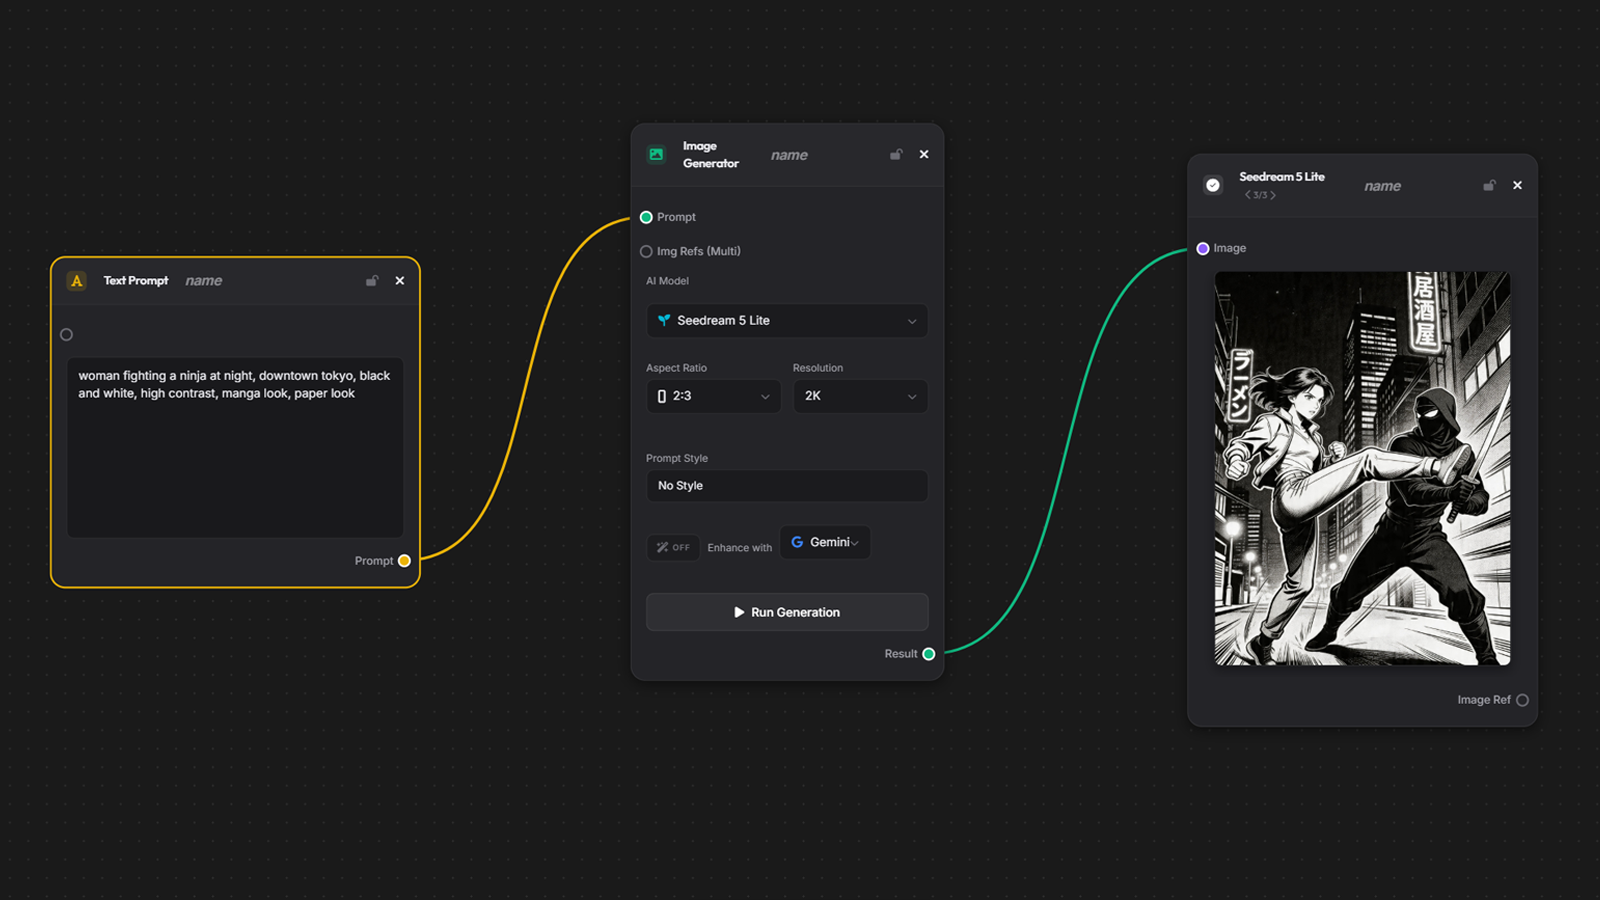
The heart of Kubock. An infinite canvas where you wire prompts into generators into results. It is where most of the work happens.
How to enter: default view, or press Shift+F1.
Typical flow:
- Place a Text node and write your prompt.
- Place a Generate node, pick a model (Flux, Seedream, SD with LoRAs, etc.) and wire the text into it.
- Hit Run — a result node appears to the right with your images.
- Drag the result into another generate node as a reference, or into a video node to animate it.
Navigation: hold Space to pan, V for select tool, H for hand (pan) tool, +/- to zoom, C to center on the selected node. The minimap in the corner always frames everything you have made, however far apart it sits: click it to jump, or drag the orange box to travel.
Know the size at a glance: every image and video on the canvas carries a small badge in its bottom corner with its real pixel size, 1920×1080 and so on. Generated results, uploads and edited images all show it, so you can tell a 1K test from a 4K keeper without opening anything. Big canvases paint a light preview of each image first and fetch the full-size file as you come closer, so the badge turns up as you zoom in on a node, not the moment the canvas opens.
Make it yours: the Settings gear in the canvas offers six themes — Dark, Soft and Light, each in a normal and a higher-contrast + variant — plus top bar position and size, grid style, snapping and zoom speed. The theme is shared with the dashboard, so the whole app follows one look.
Swift
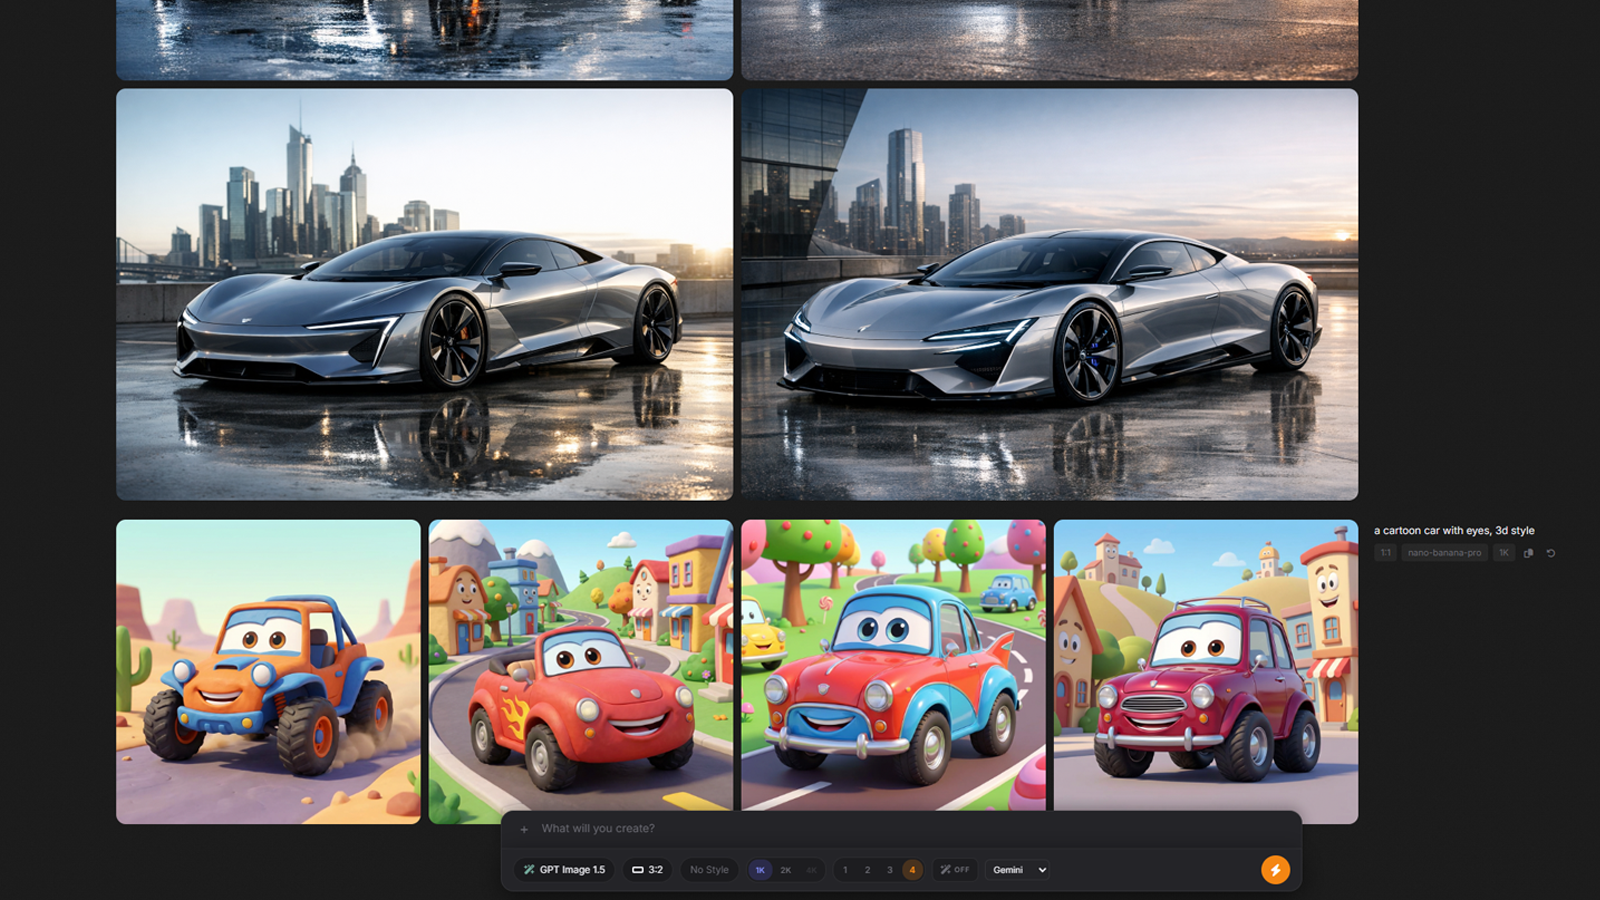
A rapid-fire feed for visual exploration. Write a prompt, generate up to four images in parallel, pick the one you like, run again. Perfect for the early part of a production when you are still hunting for a look.
How to enter: Shift+F3.
How it works:
- Type a prompt at the bottom, hit Enter to generate. Shift+Enter for line break.
- Click any image to reuse it as a reference on the next run.
- Everything lands in your Library automatically.
- You can generate 1 to 4 images per run — adjust from the count toggle.
When Stable Diffusion is the active model, the Swift bar hides the LoRA and checkpoint chips behind a single Checkpoint + button next to the model picker. See Checkpoints & LoRAs for what lives inside it.
Split
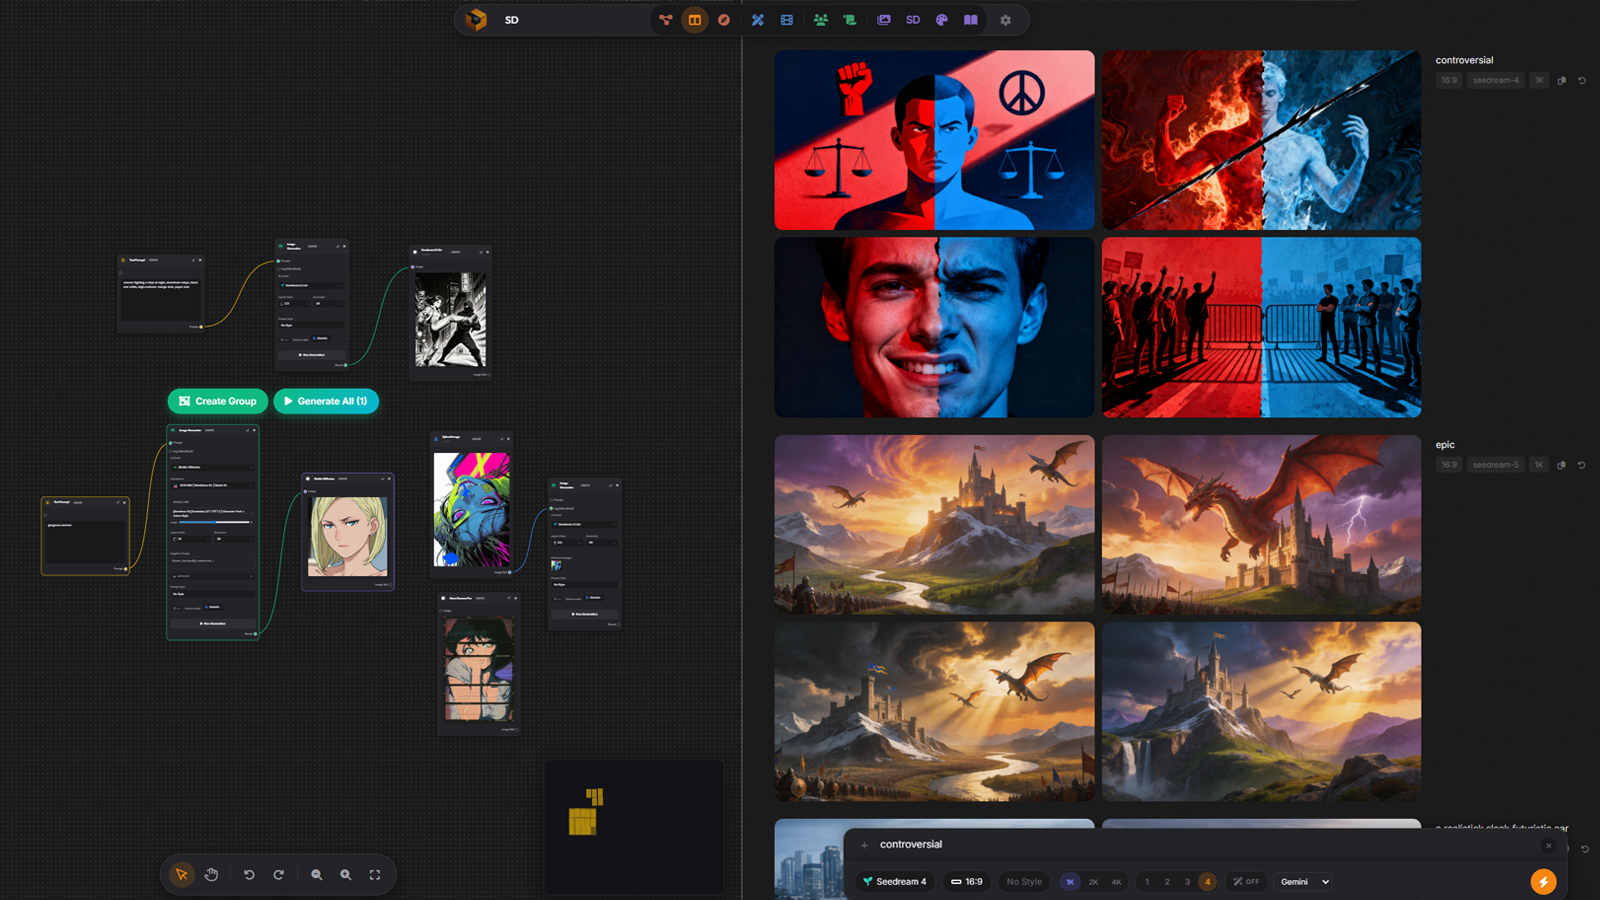
Canvas on one side, Swift on the other. Ideal when you are iterating in Swift and want to drag the best shots straight onto your canvas without switching views.
How to enter: Shift+F2. Drag the divider to resize.
Script
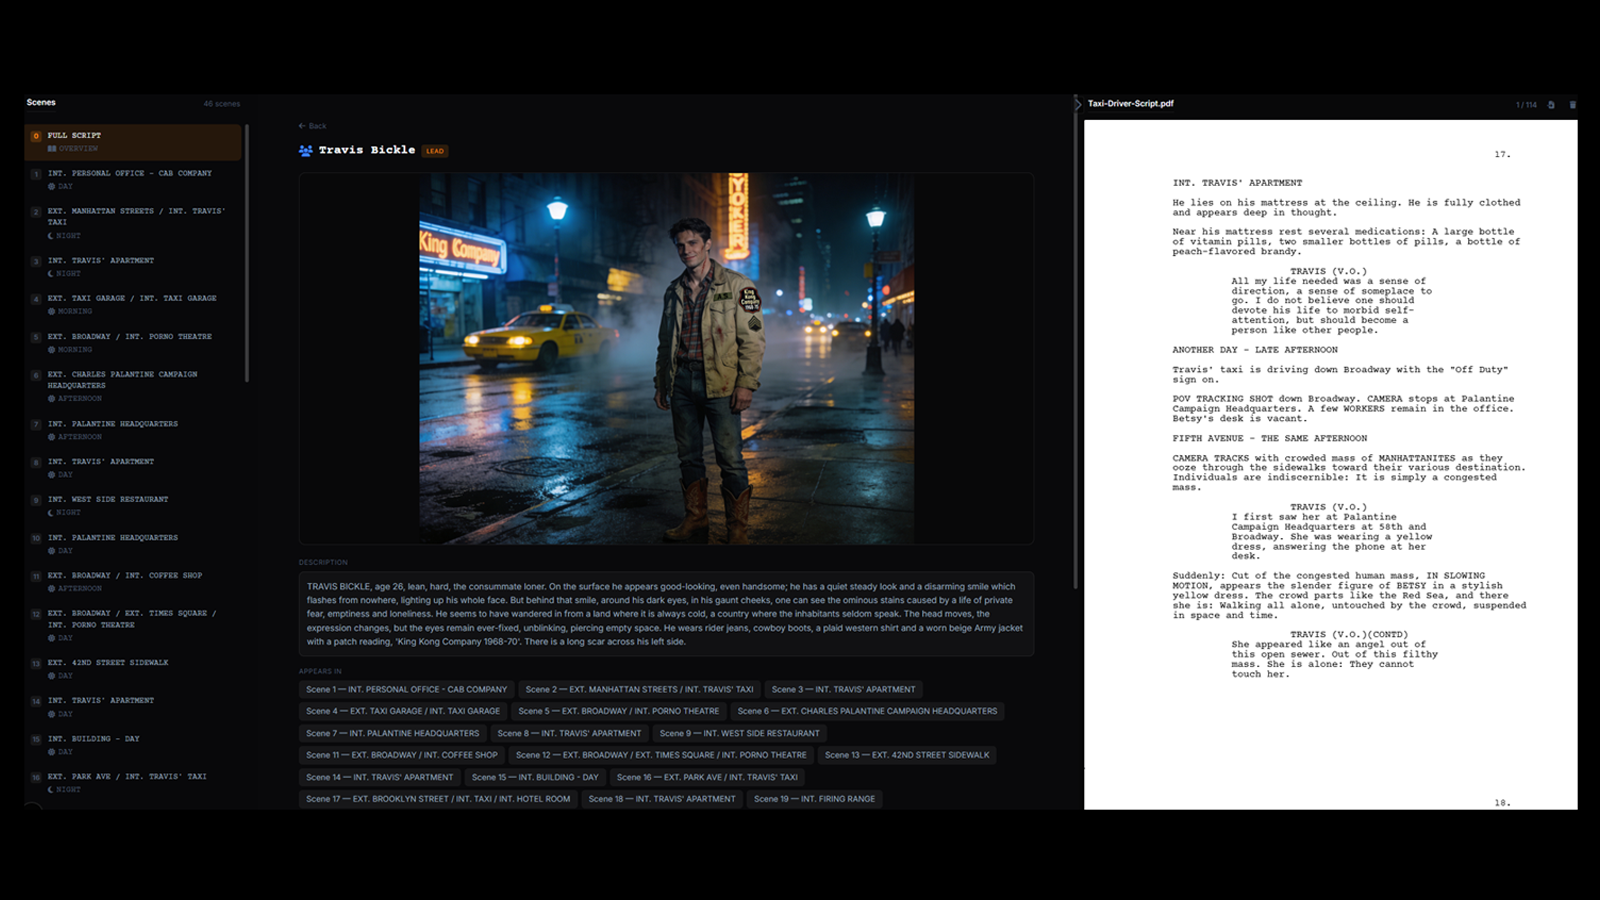
Drop a screenplay (PDF, Fountain, FDX, TXT or paste). Kubock breaks it into scenes with heading and time of day, extracts cast into lead / supporting / minor tiers, pulls out locations and props, and generates a shot list per scene.
Script mode is the only door for a screenplay: the canvas upload takes images, video and audio, so a PDF or a Fountain file goes here.
How to enter: Shift+F8.
Each shot card can be sent straight into the canvas as a prompt, turning the script into a visual world one card at a time.
Image Editor
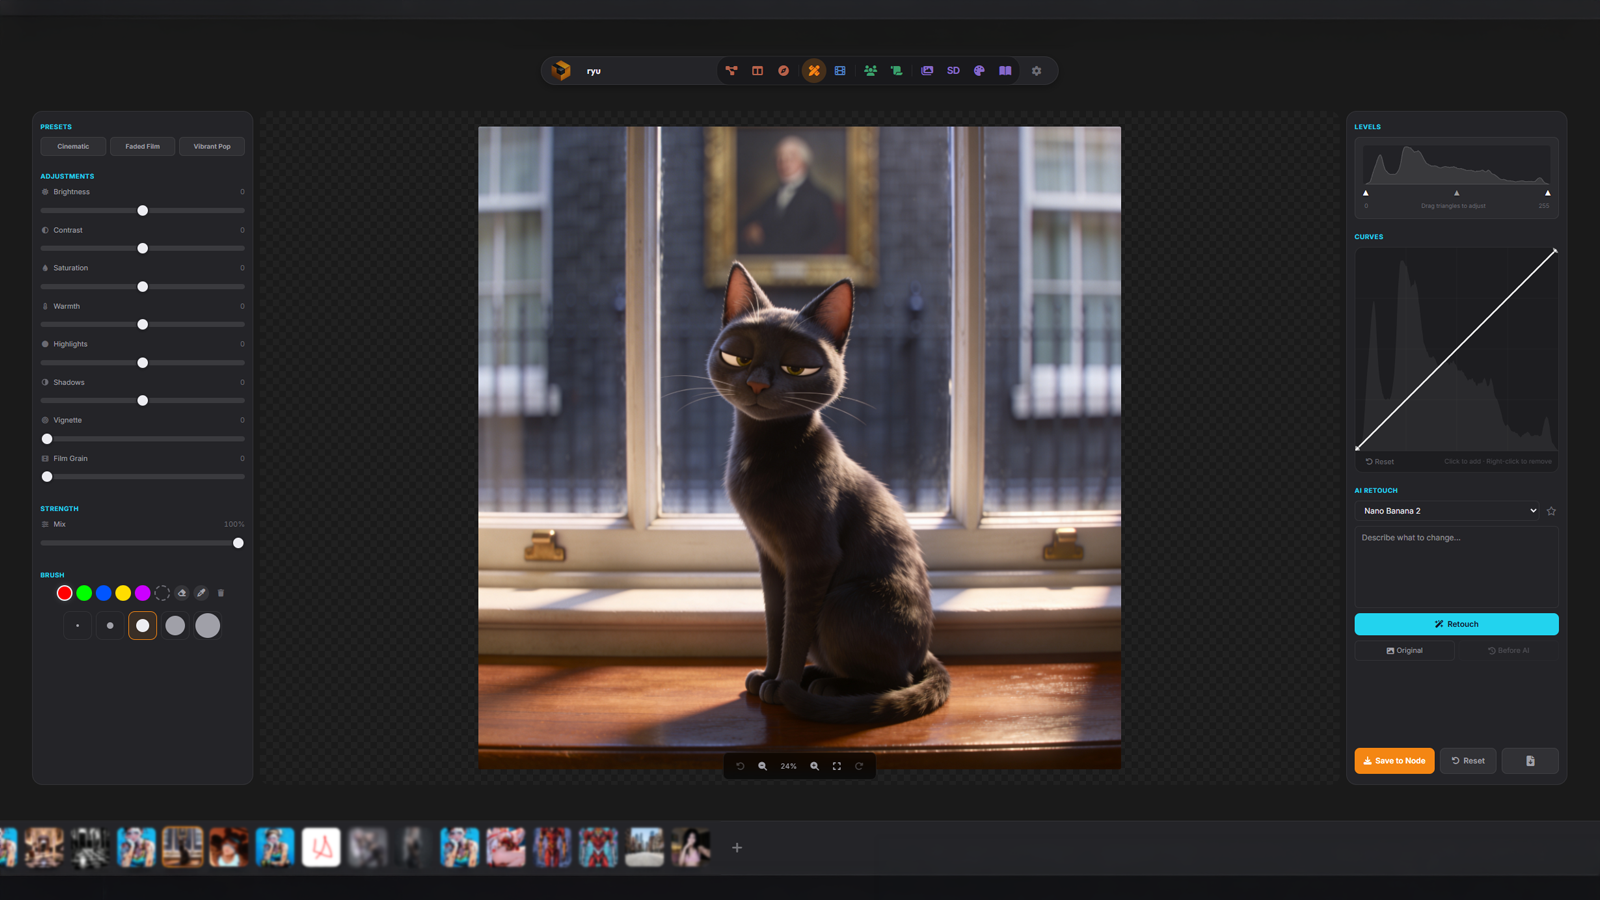
A lightweight editor for the tweaks you would otherwise make in Photoshop thirty times a day. Levels, curves, warmth, highlights, shadows. Brush and eraser. AI-powered inpainting for fixing a face or wiping an object.
How to enter: double-click any image in the canvas, or press Shift+F4. Save returns you to the canvas with the edit applied.
AI inpainting with the brush
The most powerful trick in Editor is the brush + Retouch combo. Pick a colour (or the soft eraser), paint over the area you want to change, type a short instruction in the prompt bar — "replace with blond hair", "remove the coffee cup", "change the wall to concrete" — and hit Retouch. Kubock sends the painted image straight to Nano Banana 2.1, Nano Banana 2, Nano Banana Pro or GPT Image 2 (pick the model in the dropdown next to the prompt) and returns the image with only that area changed.
The painted marks are your instruction, not a mask: the AI understands both what you painted and what you asked, so a rough scribble is enough to point at a region. Hold the Before AI button to peek at the pre-retouch image and compare.
Arrows
Next to the brush colours sits an arrow tool. Turn it on and drag across the image from the tail to the tip: an arrow is drawn in the current brush colour and size (the head scales up so it stays visible even with a thin line). Handy for pointing at something in a frame — a note to yourself, or a marker to hand a video model next to the shot. Ctrl+Z removes the last arrow, and arrows are baked into the image when you save or download it.
Rough Cut
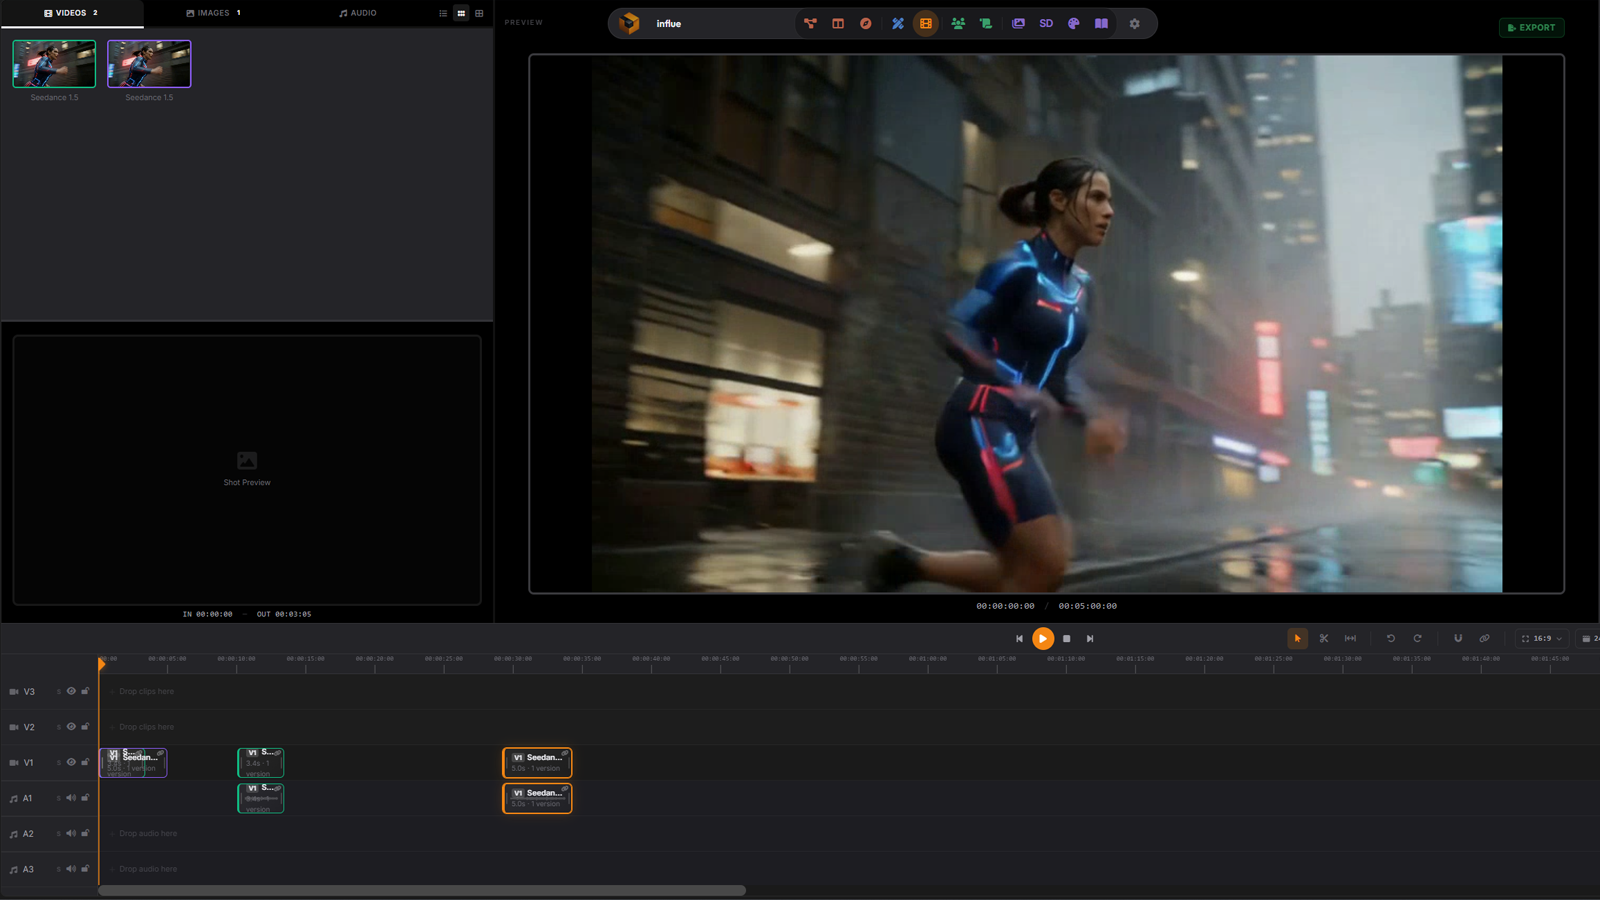
This is where your clips find their rhythm. Drag video and audio onto tracks. Trim edges, razor, rearrange. See real waveforms on the audio tracks so the pacing is honest.
How to enter: Shift+F5.
Tracks: you open on three video and three audio tracks and can add more of either, up to eight each. Every track carries its own mute, solo, lock, volume and height.
Takes: one clip, every version
AI shots arrive in batches. You generate the same beat four times, one of them is the keeper, and you want the other three within reach. So a clip in Rough Cut is not a single file: it holds every version of that shot, with one of them promoted to the version that plays.
Right-click a clip and its versions open in a grid, labelled V1, V2, V3 and named after the model that made each one. Click one to promote it: a star marks the version currently in the cut and the timeline updates on the spot. If the clip has linked audio, its partner follows. The ✕ on a thumbnail drops a version you are finished with, and the same menu holds the clip actions (unlink audio, remove a fade, delete).
The point is that swapping a take never disturbs your edit. The clip keeps its position, its length and its trim; only the picture inside it changes. Cut the sequence with whatever you have, then keep promoting better takes until the whole thing holds together.
Export: when the structure is right you have two ways out. Render a finished MP4 straight from the browser (FFmpeg.wasm stitches the tracks, gaps become black with silence, so what you export matches what you see), or — since Rough Cut is for pacing, not colour grading — export an FCPXML or XMEML edit list and finish the cut in Premiere, Final Cut or DaVinci.
Stage (3D previs)

A previs stage in 3D. You block a scene with actors and props, frame it through film cameras with real focal lengths, animate the moves, and export the result as an image or a video clip, ready to feed an AI video generator as a reference.
How to enter: Shift+F6, or the Stage button in the top toggle bar.
Why previs: AI video models are great at look and unreliable at staging. Give them a reference clip where the blocking, the camera move and the timing are already decided and they stop guessing. Stage is where you decide.
The workspace

Stage is a grid: a column of panels down each side, the viewport in the middle and the timeline along the bottom. On the left sit four boxes — Tools (the gizmo and a few actions, including Save and Bring for reusable sets), Actors (the character library, see below), a Camera, lights & primitives box and the Scene outliner, which lists everything in the scene grouped into collapsible sections for characters, props, cameras and lights: click a row to select it (Ctrl+click to add or remove one, Shift+click to pick a whole range), click the eye to hide or show it, click a section header to fold it away. On the right is a single inspector, organised like Blender or Maya into tabs: Properties holds everything about the selected object, camera included; Props is the shelf of objects and ready-made sets; Customize holds the look of the whole set; and two icons open the Assistant director and the shortcut list. Under the tabs, a panel of camera cards shows a live frame from every camera — click one to select that camera, drag one over another to reorder them, or drag one onto the shot band to drop a shot; use the S/M/L buttons to fit more or fewer per row. The clean-view button in Tools hides both columns so you see the whole set; Esc brings them back.
The viewport can split into two (drag the divider). Each half has its own view: hover it and press 1 to 5 for perspective, top, front, side or camera, or F to maximise it. Press 6 (or pick Sequence in the view selector) and the big viewport shows whatever camera the shot band hands it, frame by frame — the edited sequence, full size; press 6 again to go back to your free view. A picture-in-picture box shows the active camera (in camera views too), with a dropdown to pin one camera or follow the sequence; the small arrow in its corner folds it into a tab when it is in the way. The view selector's menu scrolls when you have more cameras than fit. The selected object is outlined in orange.
Build the set
The Camera, lights & primitives box on the left holds the essentials: a camera, a spotlight and the primitives (cube, sphere, floor plane, wall); the actors have their own box just above it. The Props tab of the inspector holds the rest — a shelf of 42 ready-made objects: vehicles (car, cockpit — a closed car interior with roof, doors and see-through glass for shots from inside — van, bus, motorcycle, bicycle, boat), street furniture (street lamp, bench, hydrant, traffic cone, bollard, dumpster, road sign, traffic light, phone booth, fountain, footbridge), nature (tree, bush, rock, planter), architecture (building, wall, column, arch, stairs, fence, door, window, elevator), and interiors (bed, chair, table, sofa, computer, bar counter, kitchen, bathtub, barrel, crate, pallet). Click one to drop it in; right-click for Add or Replace decor, which clears the set (keeping your actors, cameras and lights) and starts fresh with that object. Below them, seven Sets dress a whole scene in one click: City, Room, Office, Park, Alley, Cafe and Warehouse. Move, rotate and scale anything with the gizmo: W move, E rotate, R scale. Right-click an object to rename it, recolour it, give it a checker texture, copy and paste it, Drop to floor when it is floating, or Duplicate in a row… to lay out several copies at once (how many, how far apart, in which direction, with a little random variation if you want a crowd or a car park). Drag up and down on any number field to scrub its value, the way you would in Blender or After Effects; paste "x, y, z" into a Position field and it fills the whole row. With several objects selected, Properties switches to a group panel: Move by or Set to a position, Rotate Y and Scale them all in one go. When the selected object is animated, a line under Position tells you whether you are on a keyframe (edits update it), between keys with ANIMATE on (edits will key this frame), or between keys with ANIMATE off (edits will not stick).
The Customize tab sets the background and floor colour (both show up in the export), toggles the ground grid (also the G key) and the floating name labels, can let objects sink through the floor when you need it, and clears the stage — all of it, just the set, or just the animation.
Actors

The Actors box is a library of ready-made 3D people. Two rows — Basic (plain figures) and Stylized (dressed, cartoon-styled) — each give you a Man, Woman, Boy and Girl. Click one and it drops in at its real height (a man at 1.85 m, a child around 1.2 m), so a mixed group reads at a glance; fine-tune any figure's height in its properties. They arrive fully textured — right-click and turn Textures off for a plain clay version you can recolour. They are rigged: the Poses row under the Actors box puts the selected figure in a Standing, Sitting, Lying down, Pointing, Walking or Waving pose; the Assistant director uses the same poses when you ask for someone sitting on a bench.
Move one along a path. Right-click a figure, pick Walk to… and click points on the floor to lay a route; it moves along them. Reverse, Loop or Clear the path from the same right-click menu. Cars and props take paths too.
Characters from your canvas

Right-click any image in Node mode and pick Send to Stage. It lands as a flat standee that turns to face the camera: a cardboard cutout of your actual character, standing on your set. Give it its real height in the properties (a cat is 0.3 m, your lead is 1.7 m) and it snaps to the floor. Right-click it and choose Fixed plane if you want it to stop facing the camera and stay flat.
Pair it with Extract Object: cut the character out of a busy frame as a transparent PNG first, and the standee arrives clean, with no background rectangle.
Cameras

Stage cameras behave like film cameras: pick a focal length (24 / 35 / 50 / 85 / 135 / 200 mm), an aspect ratio, and optional thirds and safe-area guides. Look through any camera and the viewport letterboxes to exactly what will export. You can Aim a camera at any object so it stays pointed at the action, add handheld Shake, and roll it for a dutch angle. Tick Follow next to Aim and the camera also travels with the subject, keeping its distance and angle, so a walking actor stays the same size in frame; the Offset row shifts that framing without breaking the follow.
Framing in one click. Select an actor and hit Close-up, Medium or Wide in the Scene box on the left: the active camera (or a new one, if the active one is animated) lands in front of the actor, a touch to one side, at the right distance and focal length for that shot, with the head high in frame. OTS needs two actors selected in order — Ctrl+click the second — and puts the camera over the first one's shoulder looking at the second. Like the framing you got and want it again? Open the camera's Properties and Save as preset… (lens, framing offset, roll, shake and Follow travel with it); later, select any actor, pick the preset under the Framing buttons and Apply.
One-click Move presets cover the real camera moves: orbit, push in and pull back, crane up and down, pan left and right, zoom, and a dolly-zoom (the Hitchcock effect). They key themselves across the range, aim at your subject, and chain: click one after another and the playhead jumps to the end of each, so you build a longer move in steps. The Motion row picks how anything travels between keys: smooth curve, straight line, or hard steps. In Spline, an Ease in / out slider tunes the whole path for that object — left is sharper and more direct, right eases through every keyframe — and motion always starts and stops gently, never overshooting a key.
Light it
Lights are spotlights, like on a real set: aim one at your subject and shape it with Power, Spread, Falloff and Shadows in the properties. With no spotlights in the scene, Stage lights everything evenly and still casts a soft ground shadow, so exports read as a space instead of a diagram.
Animate

Every object and camera can move. Scrub the timeline to a frame, move the thing, press S (or the diamond button in the transport) to set a keyframe. Or turn on the red ANIMATE button on the timeline and every move you make records its own key — that is how you build motion; it fills red while it is recording. Drag the red marks on the ruler to re-time them, right-click one for a menu (copy, cut, paste, delete), and use the jump buttons to hop between keys. A top-down motion map shows every path from above so you can read the blocking. Space plays and pauses.
The dope sheet
The timeline is a dope sheet: one row per animated object — cameras first, then characters, props and lights — with every keyframe shown as a diamond, all of them visible at once. Fold a whole group by clicking its header (the icon or the label, not the empty row). You edit the keys straight on the rows: click a diamond to select it (it turns orange), drag it to slide it in time, Shift+click to add or remove one from the selection, Shift+drag a box across a row to grab several at once, and Shift+double-click a row to grab all of that object's keys. Drag any diamond of a selected group and the whole group slides together. With keys selected, Delete removes the keys — not the object.
Middle-mouse drag is the fast way to copy and fill keys. Middle-drag a diamond to drop a copy of that key on another frame (the original stays put). Middle-drag an empty spot on a row and you pick up the pose the object is passing through right there — a spot at frame 5, between a key at 0 and a key at 10, hands you the halfway value — then drop it as a new key wherever you release. Right-click a row for its menus: right-click the name to recolour the track; right-click the lane or a diamond for copy, cut, paste, paste relative and delete. Paste relative replays the copied move from wherever the target object currently stands, instead of teleporting it onto the original path.
Cut it with the sequencer

Below the timeline sits a band of shots: each block says "these frames belong to this camera". Hit + Shot to add one at the playhead, or drag a camera card from the inspector straight onto the band to drop a two-second shot of that camera. Drag a block to move it, stretch its edges to re-time it, pick its camera from the dropdown, and click it and press Delete to remove it. The Shot list icon at the end of the band opens every shot as a table — number, camera, in and out, length — where you can retime or swap cameras without dragging. Press play and Stage cuts from camera to camera: an edited sequence, previewed live before you have generated a single frame.
Dialogue and audio
The timeline has an audio band for pre-recorded dialogue, music or effects. Hit + on the band and a picker opens: pick a clip from your Library, or Upload audio straight from your computer — one file drops onto the timeline right away, several land in your Library to choose from. It also takes video files as an audio source (an MP4 plays only its sound), so you can lift the dialogue off a clip you already have. Drag a clip to slide it in time, right-click it to replace it with another one (keeping its position), and the ✕ removes it. It plays in sync when you hit Space and is mixed into the MP4 when you export. From Node mode you can also right-click any audio and pick Send to Stage to drop it straight onto the band.
Get the shot out

One green EXPORT button on the transport opens a small modal. Pick What — a Photo of the current frame or a Video of the timeline range — and Where: Send to nodes (it lands on your canvas as an image or video node, and in your Library under Uploads), Send to Rough Cut, or Download. Video renders fast (a 10-second clip takes a couple of seconds), and Split into shots hands you each shot of the sequence as its own clip instead of one continuous video.
Tick Depth map and Stage exports a grey depth pass straight from the 3D geometry instead of the coloured render — exact, instant and with no AI, because Stage already knows the real distance of everything in the scene. This is the depth reference you feed a video model; you do not need to run the previs through an AI depth model to get it.
The Shot prompt (in the Customize tab, next to Scene look) writes a plain-text description of the current frame (lens, angle, aspect ratio, subjects, camera move), updated live as you work. Copy it or send it to the canvas as a text node, and use it next to the previs clip when you prompt a video model.
Assistant director

The inspector's Assistant director (its own icon) is a director you brief. You direct, it executes: describe what you want in plain words and Claude builds the whole thing. From one sentence it dresses the set, drops the props, casts and places the characters, animates whatever needs to move, sets up the cameras with their lenses and moves, and cuts the shot sequence. "Build a night street, two people meet under a street lamp, cover it in three shots" is a valid brief; so is "add a slow push-in on the woman".
Ask for a different scene and it starts clean. Ask for a change and it touches only what you asked, leaving the rest where it is. To force a fresh start, tick Start a new scene before you send: it wipes the set and keeps your cameras. The whole plan lands as a single undo step, so if you hate it, Ctrl+Z once and it is gone. Stage locks while it works, then everything appears at once, camera cards included, each a live frame of what that camera sees.
Direct from a photo
Hit Reference image in the Assistant and pick a still, from your Library or straight off your disk, and the director works from the picture instead of your description. It lays the scene out with primitives to match, and then does the part that saves the most time: it puts the camera where the photo was taken, reading the perspective to match the height, the angle and the focal length. Hand it the frame you are trying to match and you get a blockout you can shoot.
With an image attached the text is optional, so a photo on its own is a valid brief. Add a line if you want something changed: "same room, but the actor stands by the window". The reference is an instruction for that one brief, not an object in the scene: if what you want is the picture standing inside the set, send it to Stage as a standee instead. Requires an Anthropic key in Profile.
Reusable sets and scenes

Save (the floppy icon in Tools) asks you what to keep, and the answer changes what you get back:
- Set: props, decor and lights. The dressing on its own, without your cast or your cameras. This is the one for a location you want to reuse with different characters.
- Scene: everything, cast and cameras included, and the shot sequence with them. Reopen it a month later and your coverage is still cut the way you left it.
Both land in the 3D Sets library in the sidebar. Bring (the folder icon) drops one into the scene you are in: click to add it on top of what you already have, or right-click to replace. What a replace clears depends on what you saved: a Set swaps the decor and leaves your actors and cameras standing, while a Scene arrives with its own cast and cameras and takes the stage over. Either way it comes in as your own copy, so dressing it up here never disturbs the saved original.
Into your final video
This is the point of Stage. Block the scene, then export the previs twice: once as the coloured clip, and once with Depth map ticked — an exact depth pass straight from the 3D geometry, no AI needed, since Stage already knows the real distances (no going through Depth / Pose just for the depth). Feed both to Seedance as video references, along with your real character images, and the generation keeps your blocking, your camera move and your timing while it swaps the gray mannequins for your cast. If you also want a pose skeleton, run the clip through Depth / Pose for that part — but the depth is better taken straight from Stage.
The canvas is built from nodes — small boxes you wire together, each doing one job. These are the ones you reach for most: the generators that turn a prompt into images, video and 3D models, the Depth / Pose node that turns a clip into control maps, and a few handy utilities. The pattern is always the same — pick a model, wire in your inputs, hit generate.
Image Generator
The Generate node turns a prompt into a still image. Wire a Text node into it, pick a model, and hit Run Generation — a result node appears to the right with your image. It is the most-used node on the canvas.
Pick the model to pick the job. Kubock ships 18 image models — Flux, Seedream, GPT Image, Nano Banana (2, 2.1 and Pro), Krea, Ideogram, Recraft, Qwen, Grok and Stable Diffusion. Star the one you reach for most and every new node opens with it (see Pick a favourite model).
Feed it references. Wire an image — or a whole group of images — into the node and the model uses them as visual references: a character to keep consistent, a look to match. How many it accepts depends on the model.
Stable Diffusion. Pick an SD checkpoint and the node grows a LoRA slot and an Advanced panel — sampler, steps, CFG, seed. The whole SD workflow is covered in Checkpoints & LoRAs.
Video Generator
The Video Generator is the node most productions revolve around. Pick a model — Kling, Veo, Sora, Seedance 2 and 2.5, MiniMax H3, Grok and more — write a prompt, wire in your references and hit generate. The input ports change with the model: only what the selected model actually accepts is shown.
The model decides the trade you are making. Seedance 2 goes up to 4K but stops at 15 seconds. Seedance 2.5 runs a shot to 30 seconds at up to 1080p, which is the one for a long take. MiniMax H3 gives you 2K with its own audio. The resolution and duration pickers redraw themselves for whichever model you select, so you are always choosing from what that model supports. One exception worth knowing: Grok hits 1080p from a prompt or a still, but its Reference mode tops out at 720p, so a shot with reference images comes back at 720 even with 1080 picked.
Keyframe vs Reference
Models that support both ways of working get a two-button toggle at the top of the node:
- Keyframe — animate a still. Wire an image into First Frame (and optionally Last Frame) and the video starts (and ends) exactly on your image. This is the continuity workhorse: pair it with Extract Last Frame to chain clips without seams.
- Reference — guide the generation. Wire in reference images (who and what should appear), a reference video (how it should move — see Depth / Pose) and reference audio. The model composes a new shot from them.
The two modes are exclusive: switching hides the other mode's ports. Seedance 2 (Standard, Fast and Mini), Seedance 2.5 and MiniMax H3 open in Reference mode by default, and they are the models that take references furthest — up to 9 reference images (Seedance 2.5 takes many more), 3 reference videos and 3 audio tracks at once (the Ref Video and Ref Audio inputs each take up to three cables). To cast specific characters by name in the prompt, see Aliases.
Depth / Pose

One node turns any video or image into the two control maps a generator loves. Flip the Depth and Pose toggles to pick either one or both.
Depth is a grayscale version of the clip where brightness means distance to the camera: all the movement, blocking and space survive, the colours, faces and style are gone. Pose is a full-body skeleton — body, hands and face — that carries the performance: limbs, gesture, gait. Where depth gives you volume, pose gives you motion. On video you can tint the depth pass from the Color picker (Turbo, Inferno, Magma, Viridis) if a coloured map reads better; grayscale is the default and the safest choice for a reference.
That is exactly what you want in a reference. Feed a normal clip to a video generator and it copies the look along with the motion. Feed it these maps instead and the model follows your staging and camera move while inventing the look from your prompt and your character references.
How to use it
- Right-click the canvas and pick Depth / Pose, or drag a cable out of any video (or image) result and choose it from the connect menu.
- Turn on Depth, Pose, or both, then hit Extract.
- The result appears as a node (and lands in your Library). Wire it into the Ref Video input of a video node — Seedance 2 accepts it directly — along with your prompt and image references.
Depth and pose together
The two work best side by side but separate. Turn on both toggles and tick Separate outputs: the node hands you the depth map and the pose skeleton as two nodes, so you can feed them to Seedance as two separate video references — not one merged map, which reads worse. Leave Separate off and it fuses them into a single map instead, there if you want it. Maps come back silent by default, so the clip's sound never sneaks into a generation as a reference; tick Keep audio if you want the depth or pose video with the original soundtrack. For a Stage previs the depth already comes exact from Stage itself (tick Depth map when you export), so you reach for this node to add the pose skeleton, or to pull depth and pose from real footage that did not come from Stage. Feed them to Seedance and the generation keeps your blocking, camera move and timing while swapping the gray mannequins for your cast.
3D Generator

Turn a text prompt or an image into a real 3D model: an actual object you can rotate, download as a GLB file, and place in Stage. Wire a Text node or an Image node into it, pick a model, choose how much detail you want, and hit Generate 3D.
Pick the model. Each one is a different 3D engine: Trellis 2 (image only, quick and cheap), Pixal3D (image only, built on Trellis 2 but sticks closer to the picture), Hunyuan 3D, Meshy 6, and Tripo P1. Every model except Trellis 2 and Pixal3D also works straight from a text prompt, with no image needed.
More angles, better model. With Hunyuan 3D, Meshy 6 and Trellis 2 the node has four image inputs: Front, Left, Back and Right. Only Front is required; each extra side shows the model what it can't see from the front. Use full-body shots of the same character in the same pose, not close-ups. Got a character sheet with every view in one picture? Right-click it and choose Separate Grid to get one image per view. Extra sides cost a little more on Hunyuan 3D and Meshy 6.
Detail: Previz, Normal or Hero. Previz is light and fast, perfect for blocking a scene where the model just needs to be there. Hero is maximum detail for the asset that matters, and takes longer. Normal sits in between.
What you get. A result node with a still preview. Click it to spin the model in 3D. From there you can download the GLB, or hit Send to Stage to drop it into a previs scene like any other object.
Other Nodes
Five more nodes round out the toolkit. All of them live in the right-click menu, and most have a number key (see shortcuts).
Audio Generator
One node for everything you hear: music, sound effects and voice. Pick the model to pick the job — music models, SFX models, text-to-speech voices, or an all-in-one model that handles all three. Wire a text node in, describe what you want (or paste the line to be spoken), generate.
Score a clip you already have. Choose MMAudio V2 and the node grows a Video input. Wire a clip into it and the model watches the picture and writes the sound for it: footsteps landing where the feet land, a door thudding when it shuts. What comes back is your clip with the audio on it, ready for the timeline, not a loose track you have to line up. The prompt turns optional here: leave it empty and it scores what it sees, or write one to steer the mood.
Extract Object
Type what you want cut out — "the woman in the red coat", "the car" — and the node lifts it from the image as a transparent PNG, cropped tight. Perfect for turning a busy frame into a clean character reference, or for sending a clean cutout to Stage as a standee.
Upscale
Enlarges an image 2×, 3× or 4×. Use it last, when a shot has earned its place: upscale the keeper, not the whole contact sheet.
Describe Image
The reverse gear: wire an image in and get a text description out, as a prompt. Handy for reverse-engineering a look you like into words you can edit and reuse.
AI Assistant
A chat node that knows your canvas. Ask it questions, or ask it to build for you — "set up a text-to-video chain with two character references" — and it creates and wires the nodes itself. Requires an Anthropic key in Profile.
Everything you make and everything you bring in has a home here. The Library keeps every generation, tagged and searchable; Checkpoints & LoRAs, Prompt Styles and the Prompt Library are the reusable pieces — the models, looks and prompts you build once and call up again and again.
Library
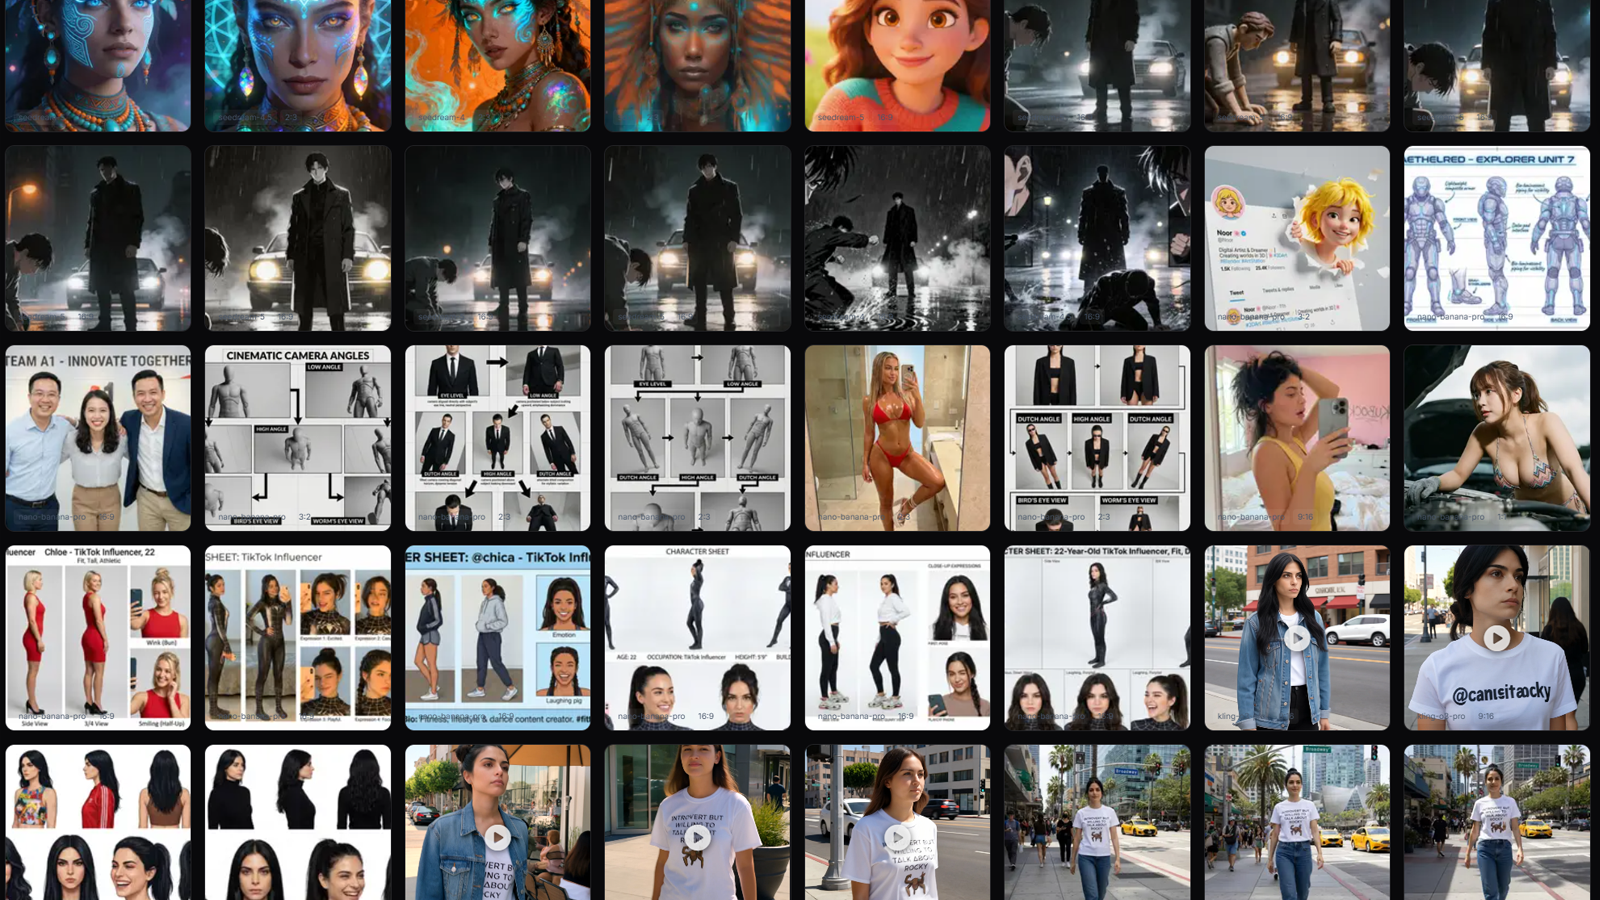
Every generation is kept. Prompt, model, aspect ratio and origin canvas attached to each file. Search, filter, tag, favourite, bulk-select. Assets cross projects freely — design a character once, pull it into any production.
How to open: Shift+F9 or the Library button in the sidebar.
Checkpoints & LoRAs
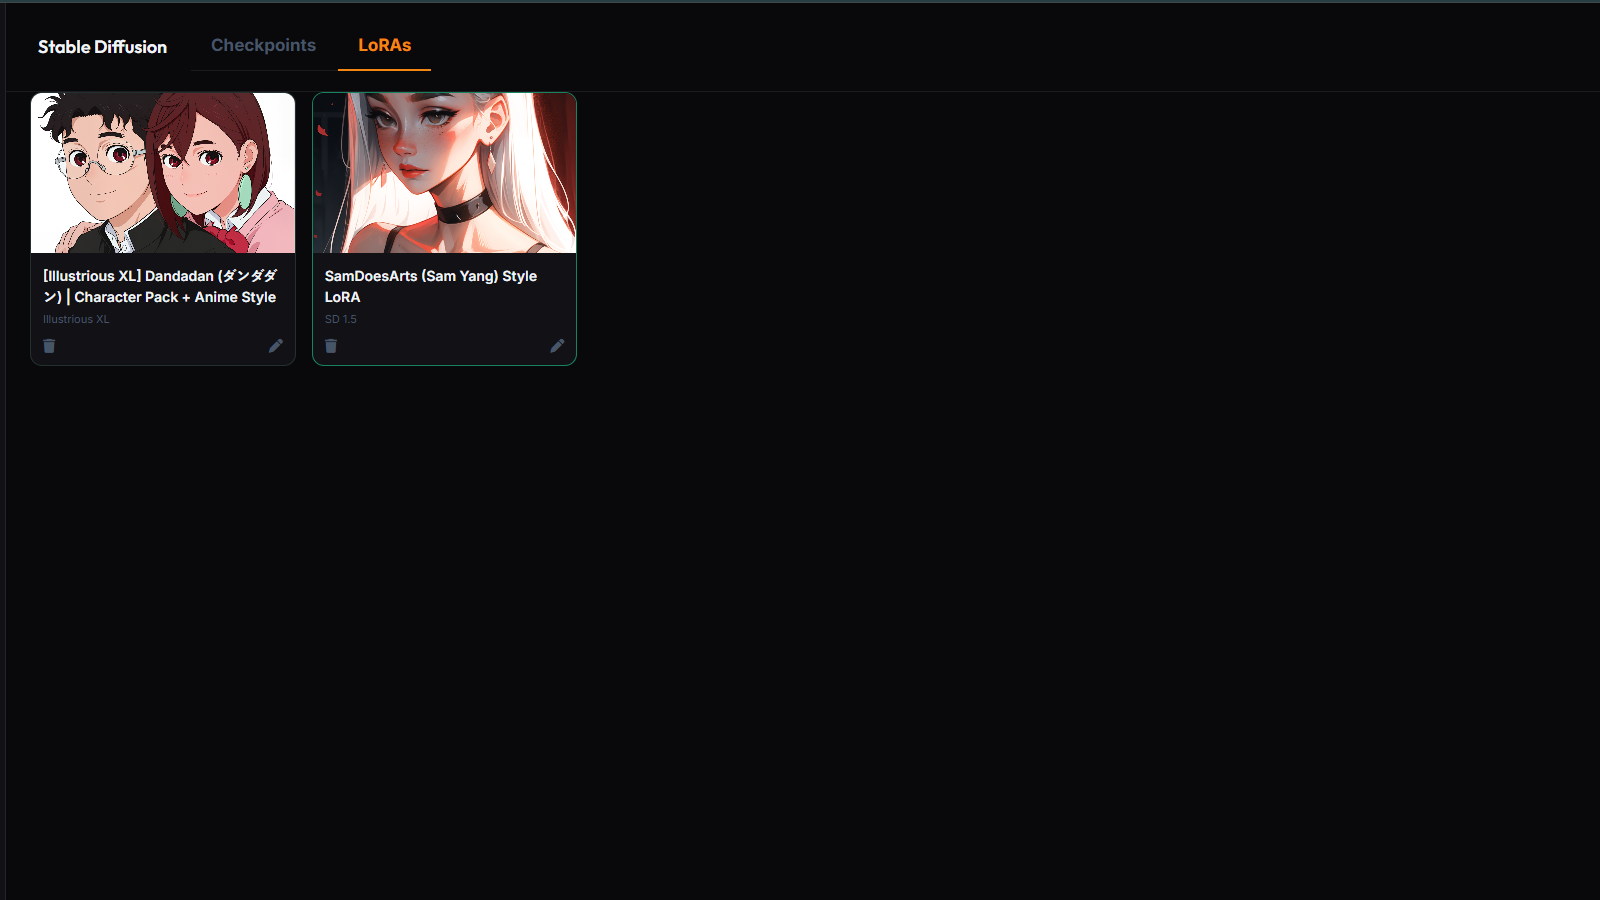
If you generate with Stable Diffusion (SDXL, Pony, Illustrious, NoobAI) you will live here. Paste a Civitai URL to import a checkpoint or a LoRA — Kubock grabs the metadata, trigger words and preview automatically.
How to open: Shift+F10 or the Checkpoints / LoRAs button in the sidebar.
Using a LoRA in the canvas:
- Place a Generate node and pick an SD checkpoint.
- In the same node, add a LoRA slot and pick one from your library — the trigger word is inserted into the prompt automatically.
- Adjust strength per LoRA (0.0 – 2.0).
Checkpoint + (Swift)
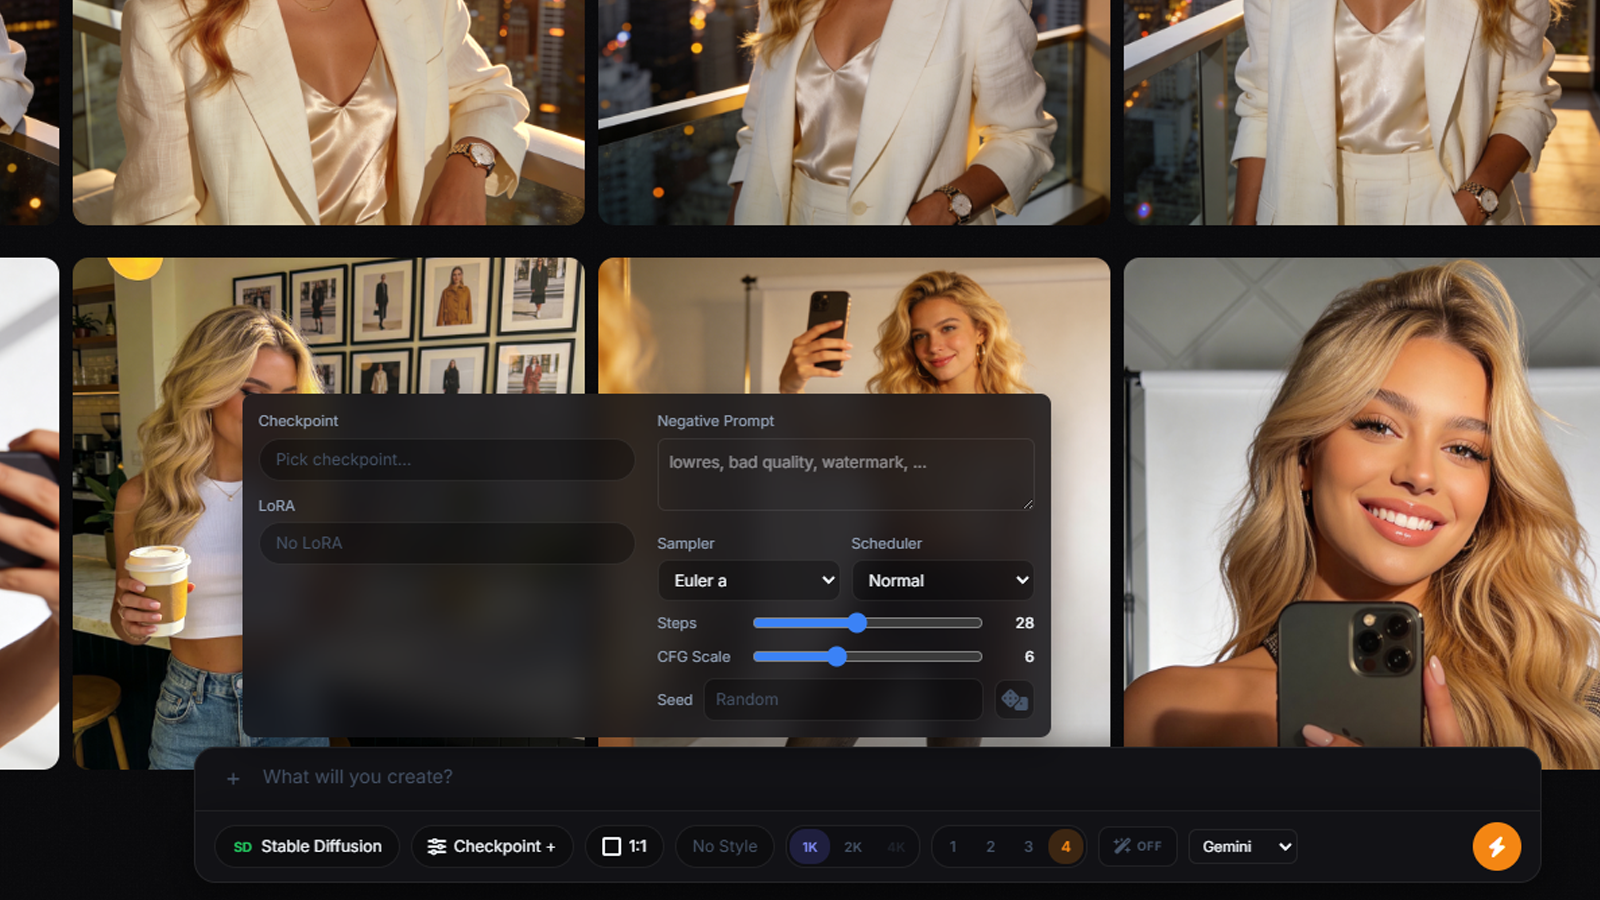
In Swift the SD controls used to clutter the bar. Now they live behind a single Checkpoint + button, next to the model selector. Click it to open a wide popover split into two columns:
- Left column: checkpoint picker and LoRA slots (inline — no extra popup).
- Right column: Negative Prompt, Sampler, Scheduler, Steps, CFG Scale, Seed.
Only LoRAs compatible with the selected checkpoint's base model appear in the picker, so you cannot accidentally mix an SDXL LoRA with a Pony checkpoint.
Advanced controls
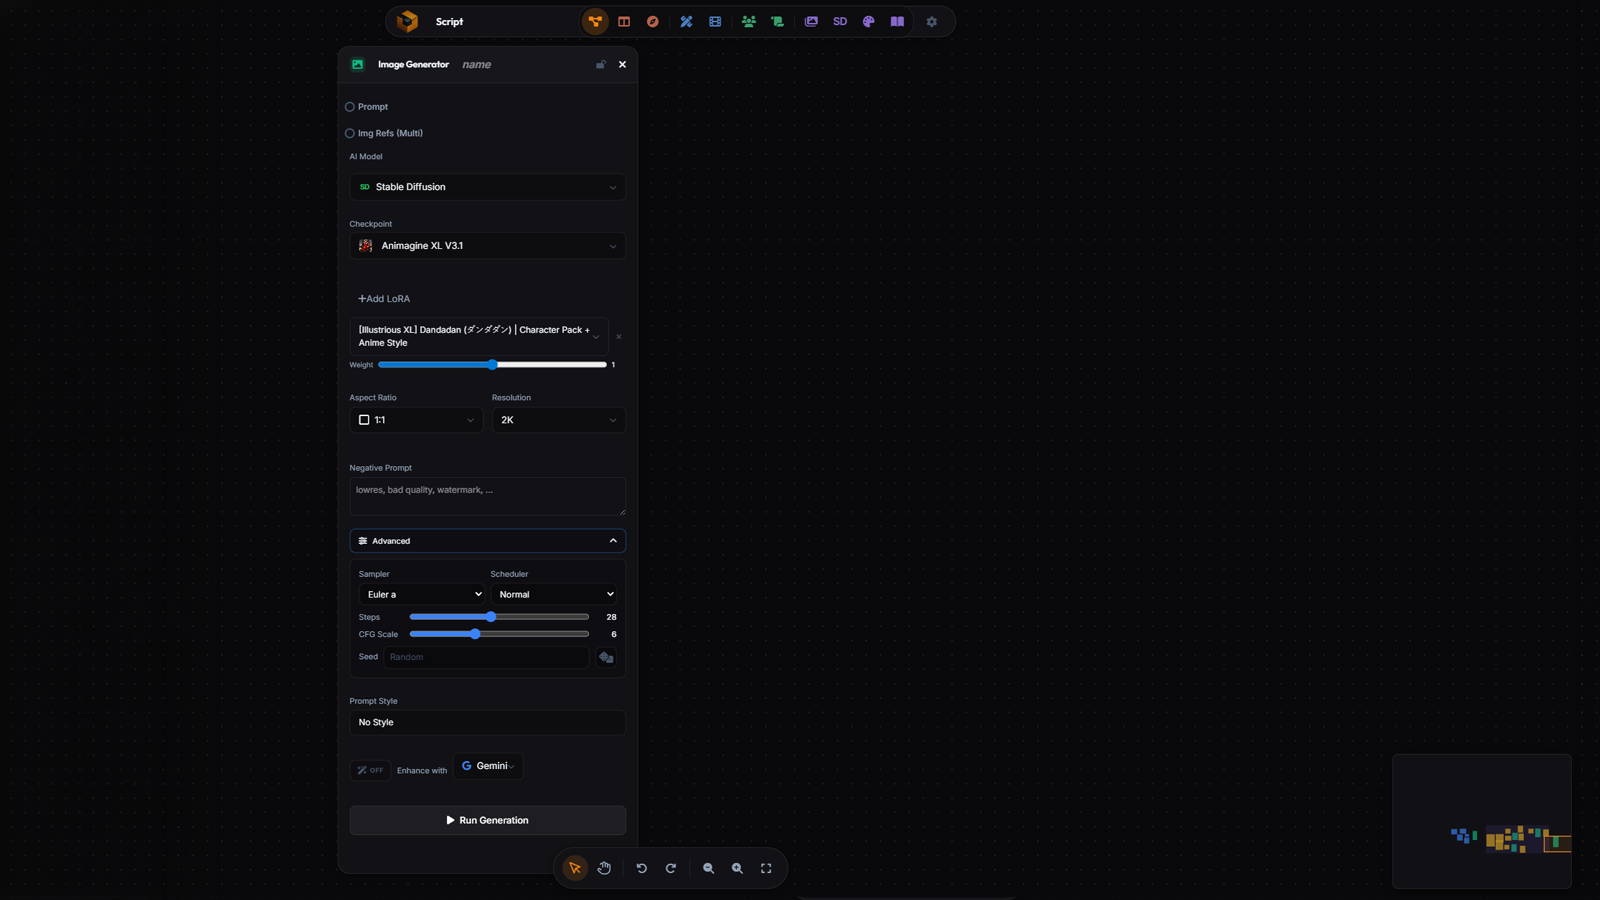
Same controls in both Swift and the Generate node. In nodes they sit behind an Advanced accordion; in Swift they live inside Checkpoint +.
- Negative Prompt — SD only. What you don't want in the image ("blurry, extra fingers, text"). Kept separate from the main prompt so your positive prompt stays clean.
- Sampler — the algorithm that denoises the image. Euler a is a safe default. Also available: Euler, Heun, DPM++ 2M, DPM++ SDE, DPM2, DDIM, LCM.
- Scheduler — the pacing of the denoise. Normal is the default. Also: Karras, Exponential, SGM Uniform.
- Steps — how many passes the sampler runs. More steps = more detail, slower. 28 is a fine starting point; LCM samplers need as few as 4-8.
- CFG Scale — prompt adherence. Low values (3-5) give softer, more creative images. High (8-12) sticks tighter to the prompt. 6 is a good middle ground.
- Seed — leave blank for random. Paste a number to reproduce an exact image, or lock a seed while you tweak other parameters.
Prompt Styles
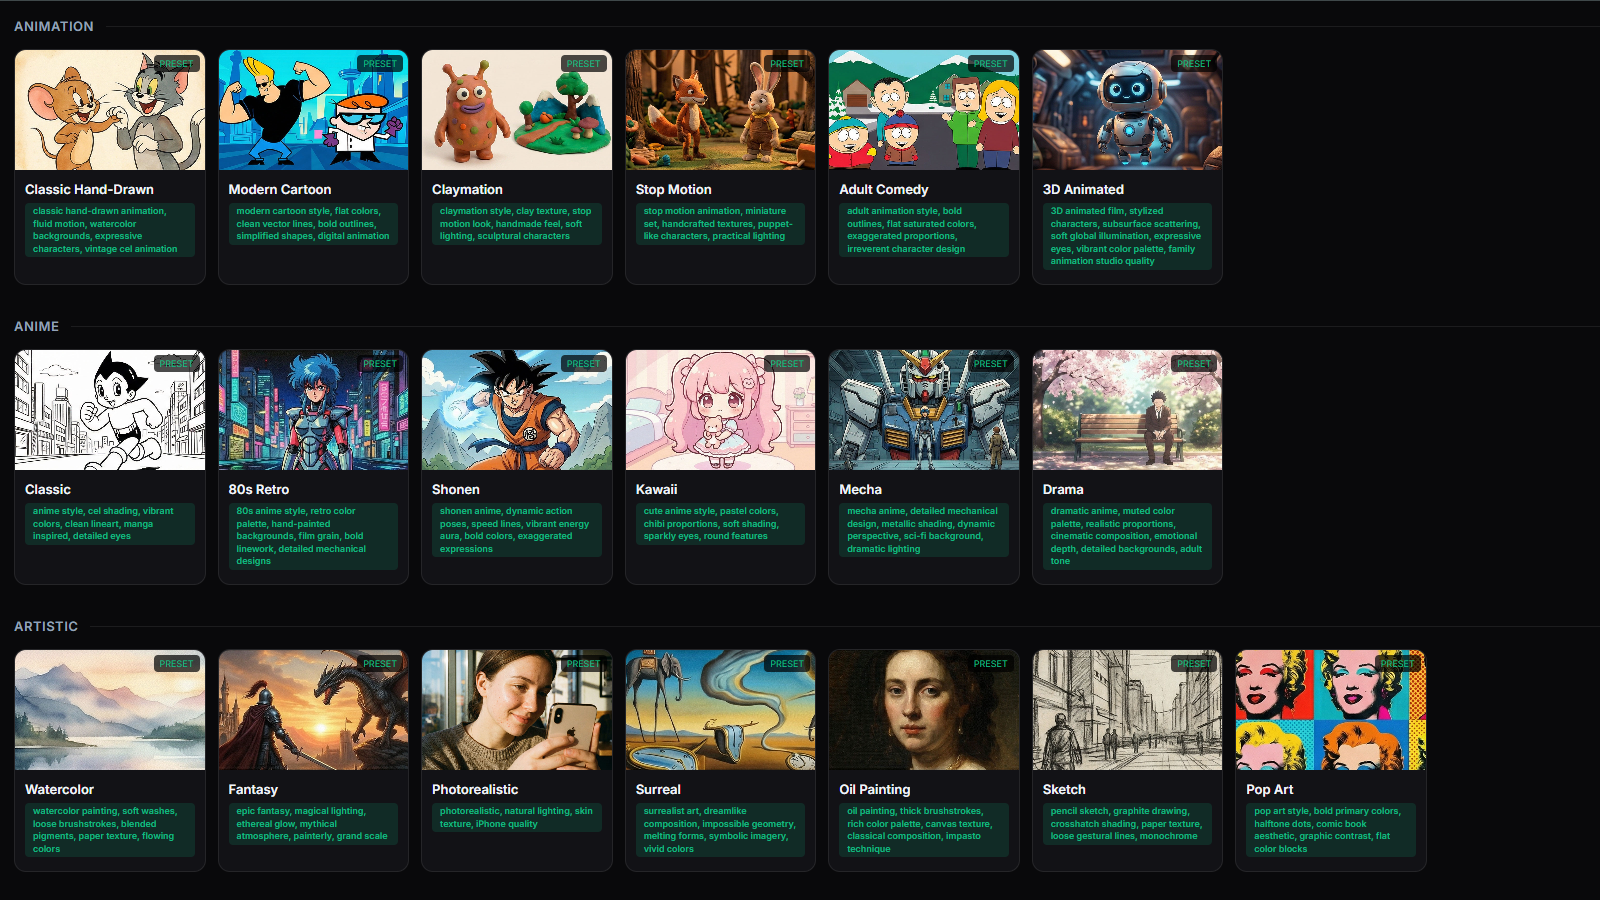
A style is a small bundle of tokens — "cinematic, backlit, 35mm, shallow depth of field" — that you want to append to many prompts without retyping.
How to open: Shift+F11. Create styles, group them, and invoke them inside any prompt with /s.
Prompt Library
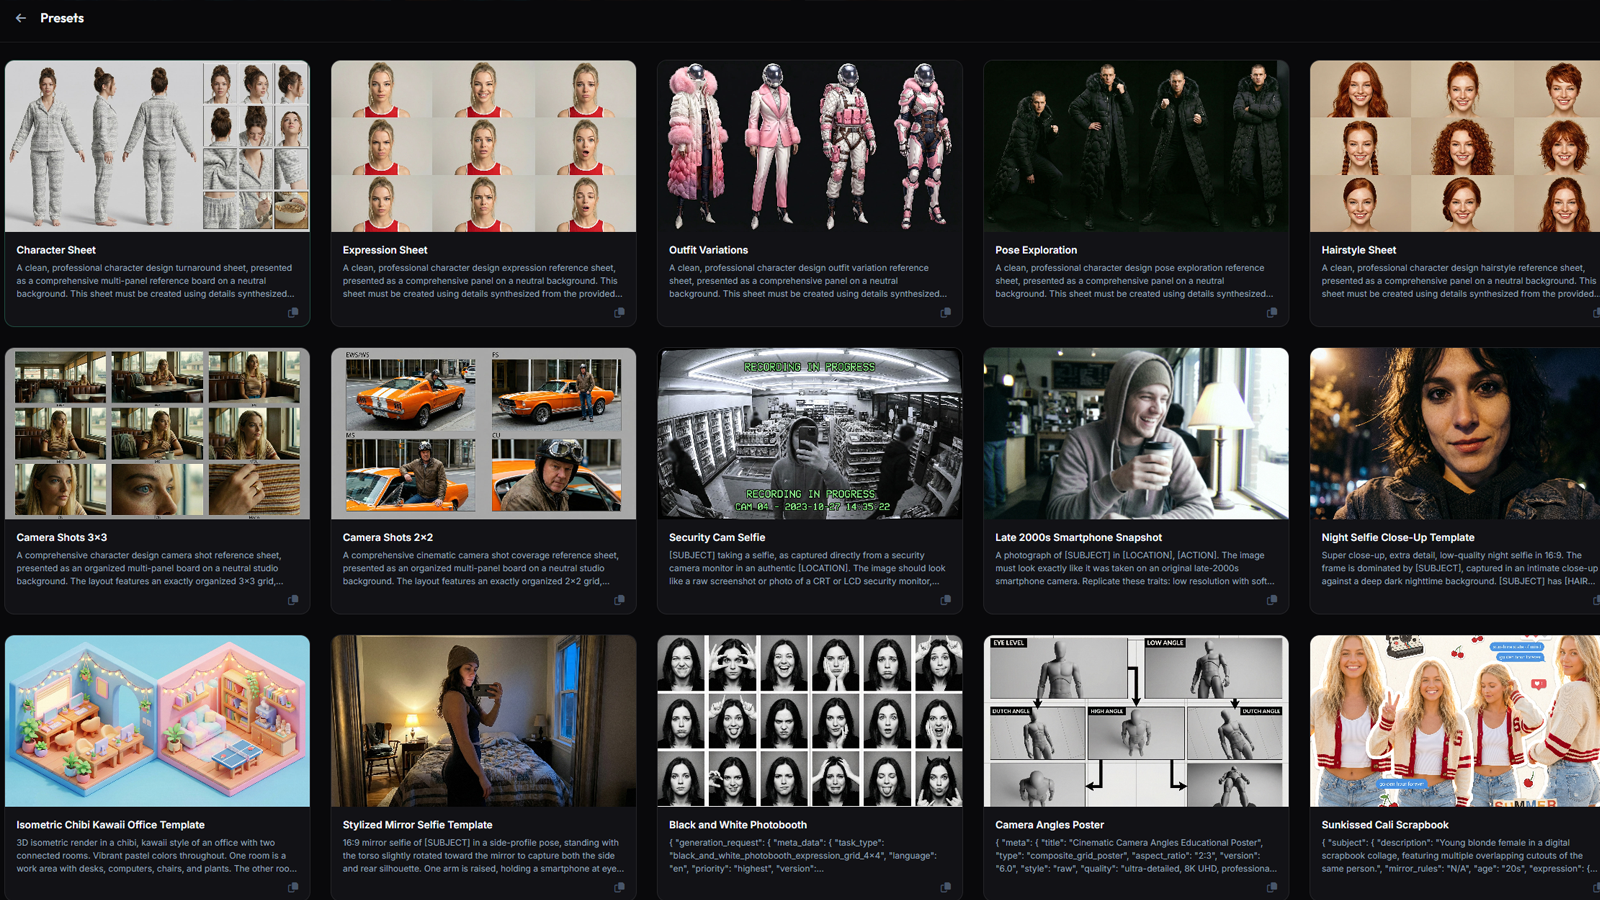
Save the prompts you come back to — your go-to character sheet prompt, your favourite establishing-shot prompt, your vfx test prompt. Recall them with /p from any textarea.
How to open: Shift+F12.
The features that turn Kubock from a prompt box into a real production tool. Aliases let you cast a character by name across every canvas, groups and locks keep a busy canvas under control, and the rest handle the chores of organising, reusing and finding your work fast.
Aliases: @ # $
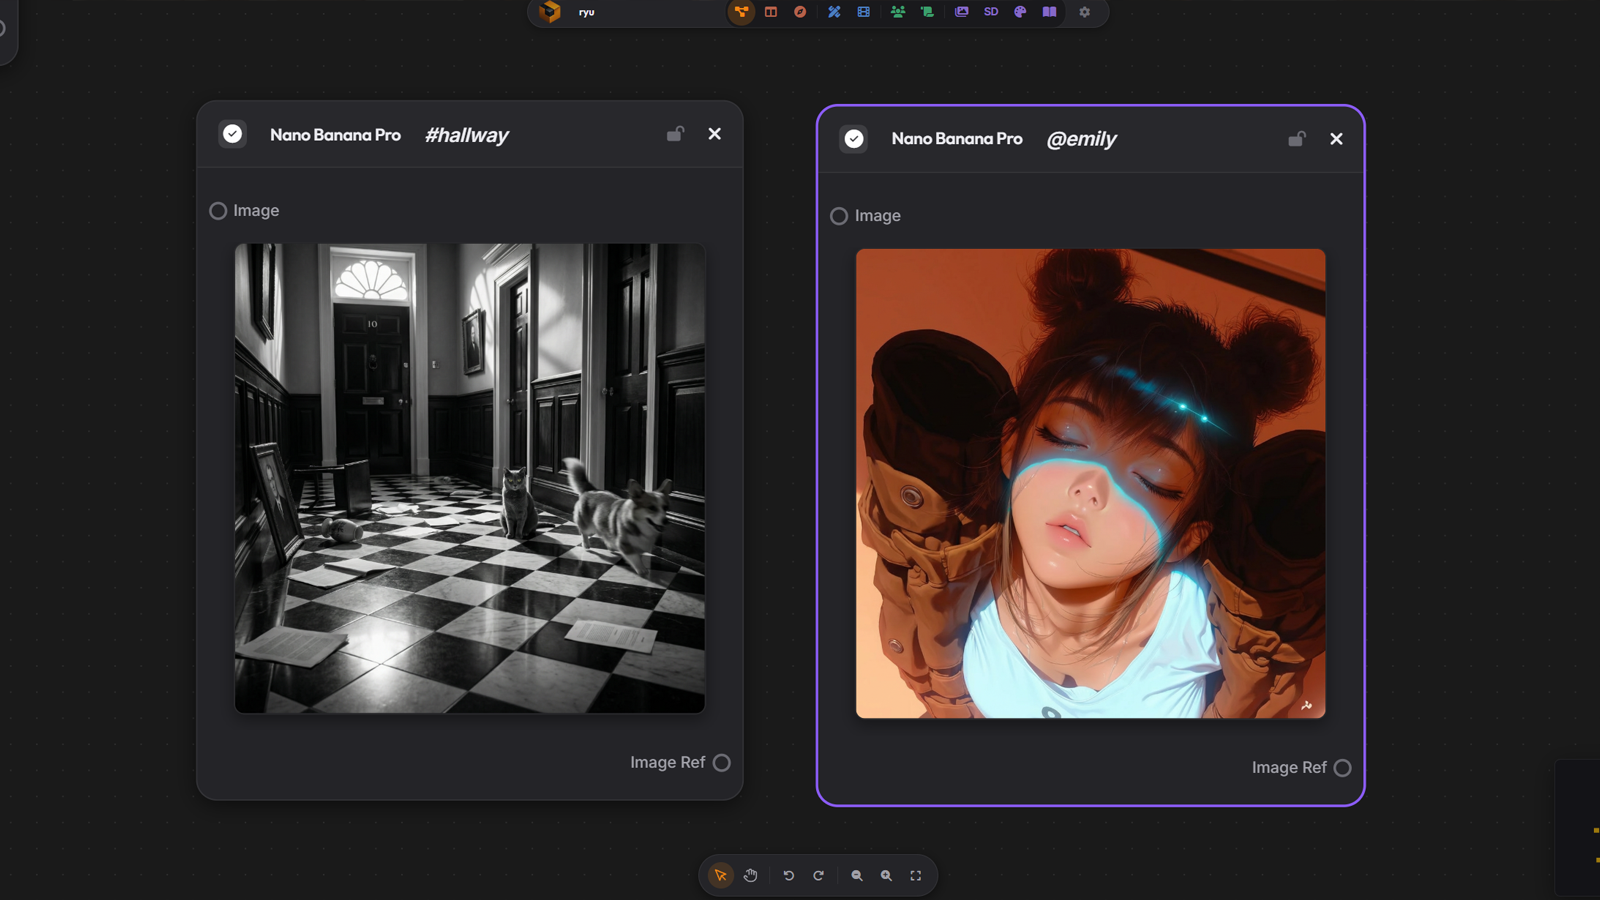
Aliases are the superpower that makes Kubock a production tool instead of a prompt box. They let you write @clara in any prompt and Kubock inserts every image of Clara — no cables, no copy-paste.
The three prefixes
- @ — characters and references (images)
- # — locations and beats (text)
- $ — styles and looks (text)
How to create one
On a single node: open the node, type an alias in the alias field. Now @that_name in any prompt in the project pulls its content.
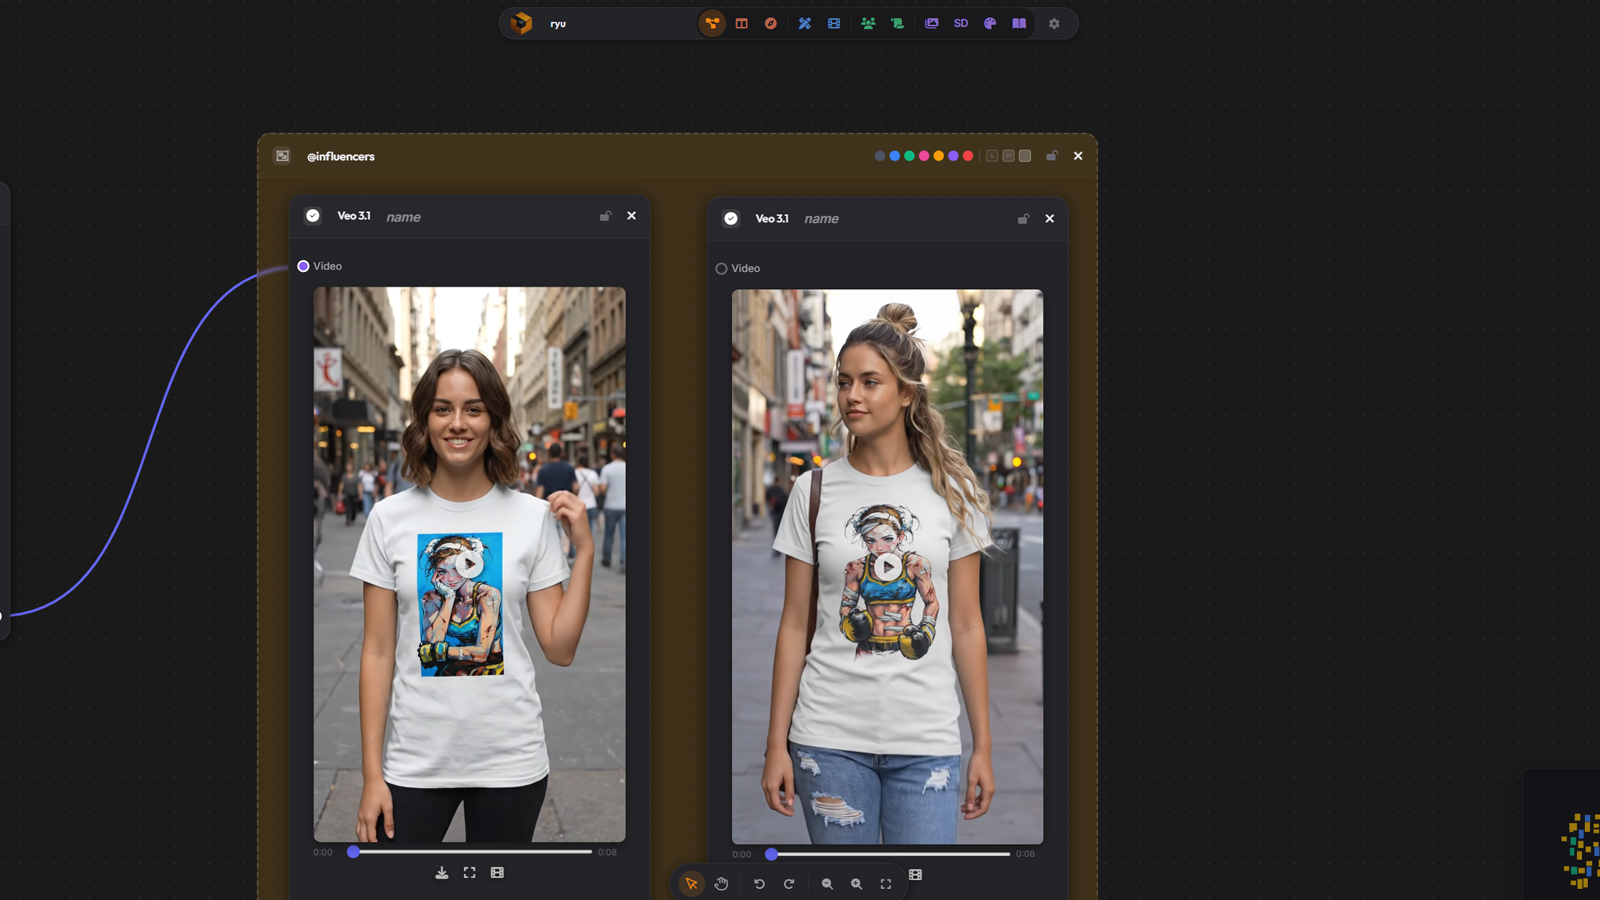
On a group: title a group starting with one of the three prefixes, e.g. @main_cast. Every image node inside the group now feeds that alias, in top-to-bottom reading order.
Aliases work across every canvas in the project. Define once, use everywhere.
Cast & Assets panel
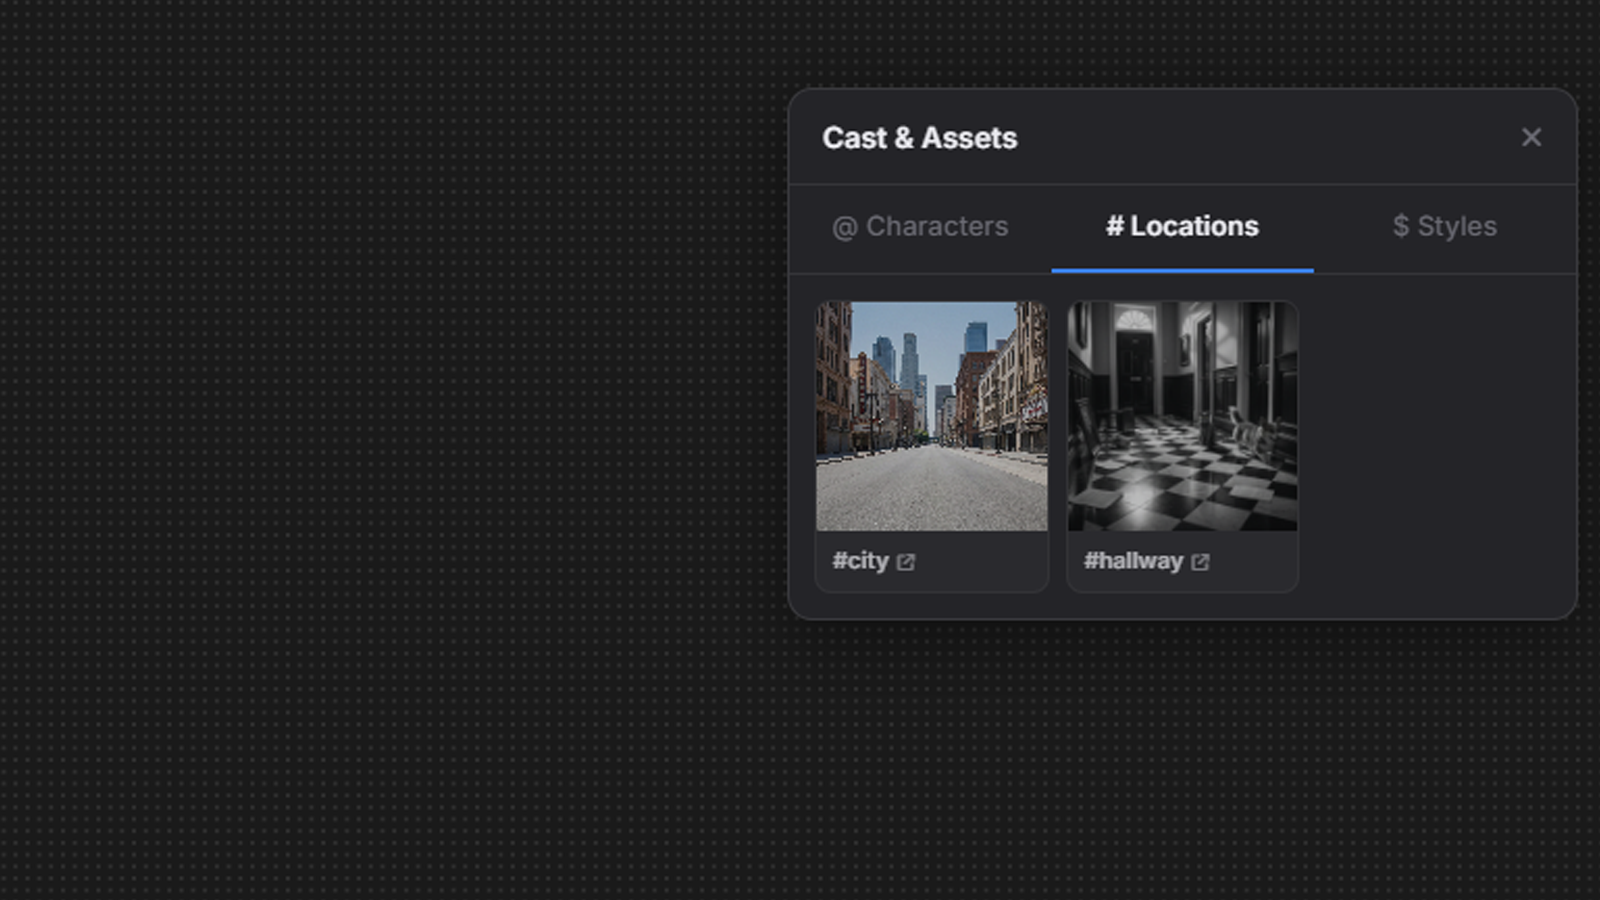
A floating panel that shows every alias in the current project at a glance.
How to open: Shift+F7, or the people icon in the top toggle bar.
Three tabs — @ Characters, # Locations, $ Styles — each with a thumbnail grid of every aliased node and group in the project. Click an item to preview the asset. Use it when you have lost track of which characters you have already designed, or when you want to confirm a name before typing @clara into a prompt and getting nothing.
The panel is read-only — to edit an alias, jump back to its canvas.
Slash commands
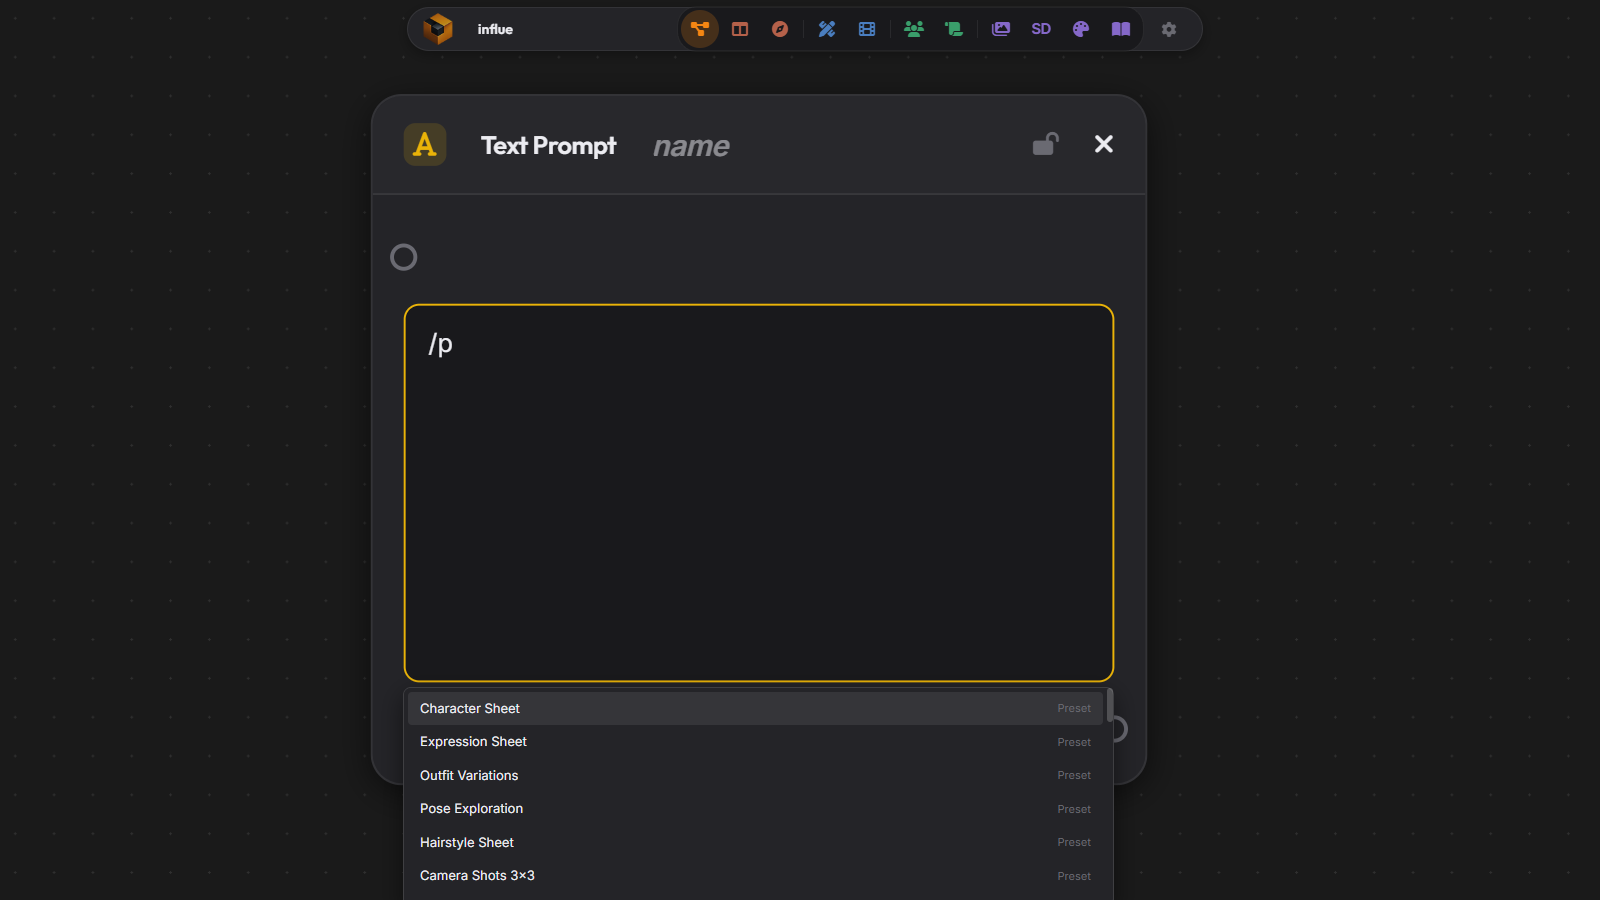
Any prompt textarea in Kubock — text node, generate node, swift prompt bar — supports two slash commands:
- /p — insert a saved prompt from your Prompt Library.
- /s — insert a style from your Prompt Styles.
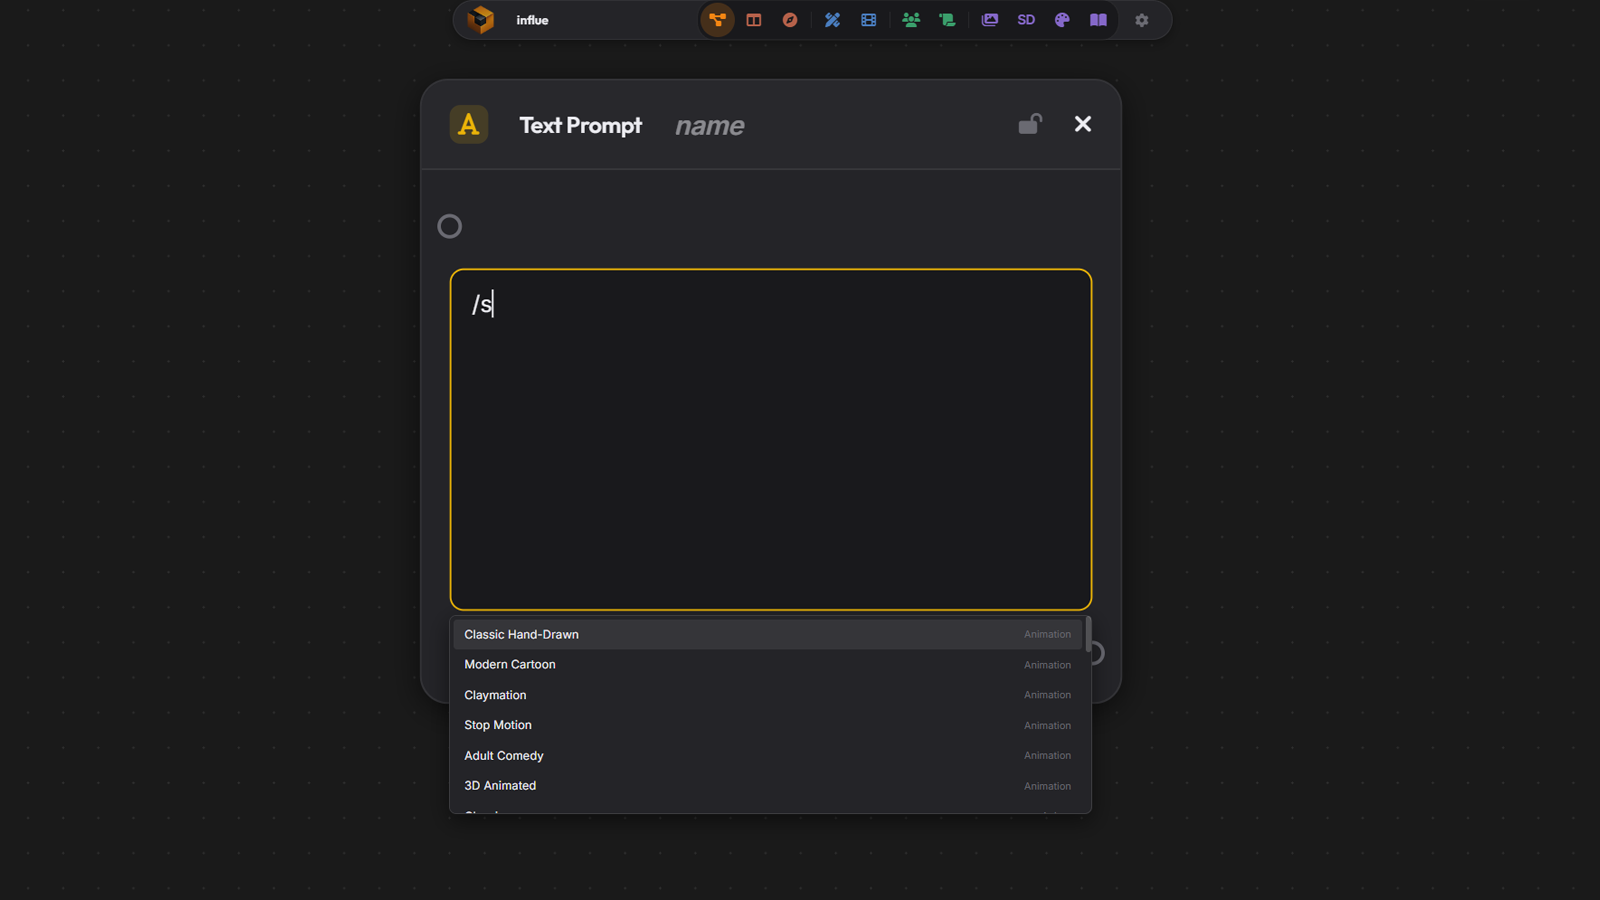
Navigation inside the dropdown: ↑ / ↓ to move, Enter to insert, Esc to close. You can also click with the mouse.
Groups
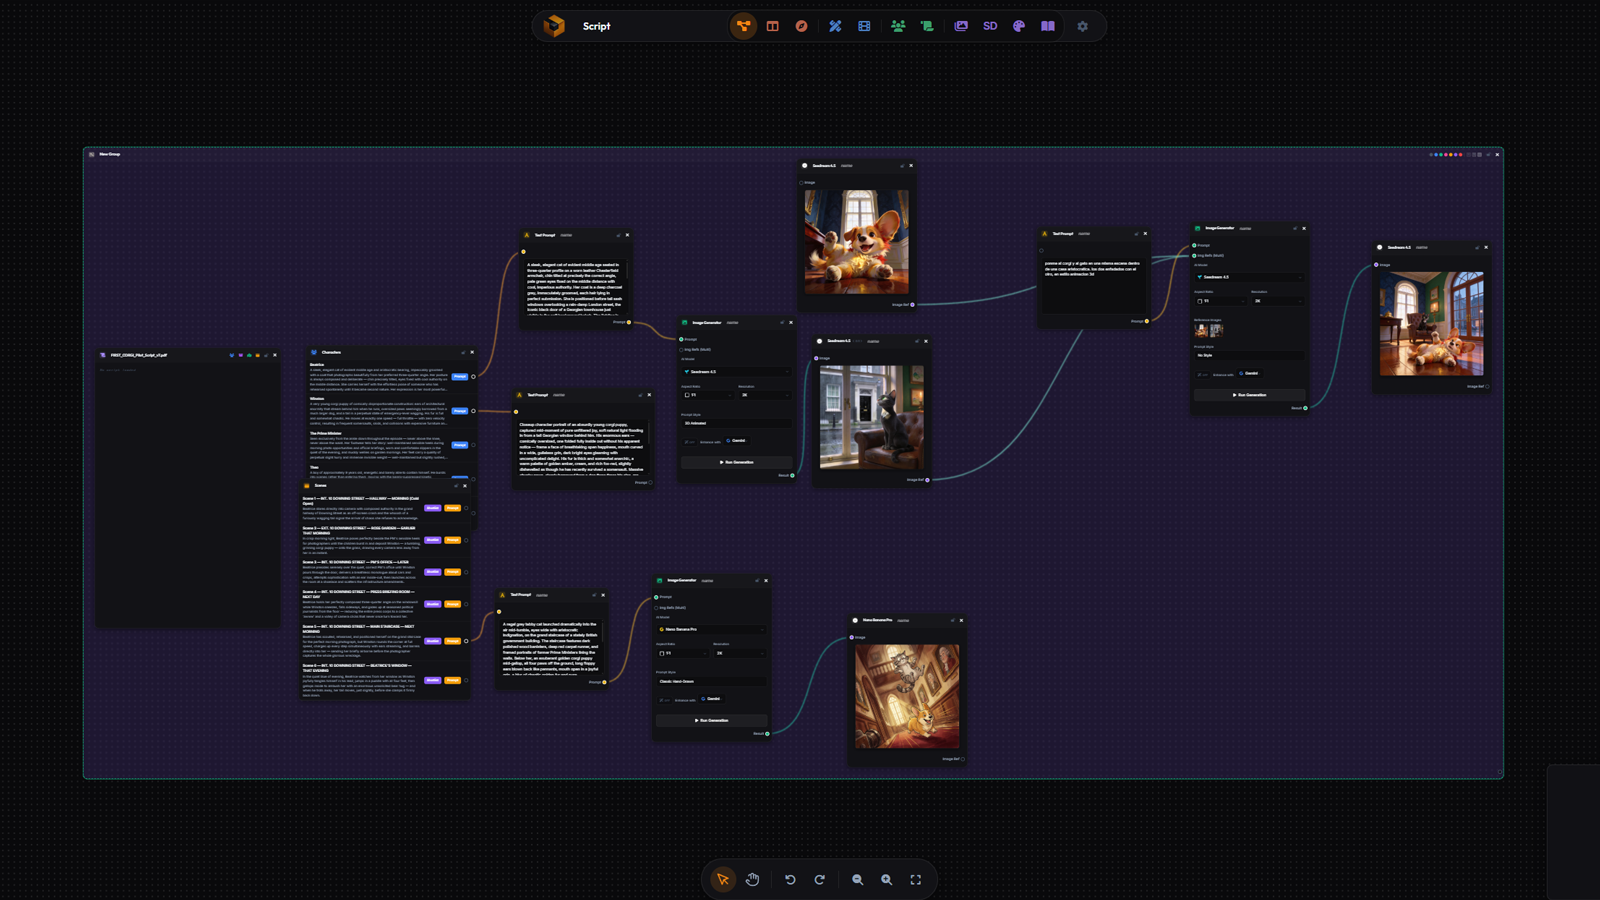
Groups are for two things:
- Visual order — corral a scene, a character study, a mood board inside a titled box.
- Multi-image reference — every group has a green out-images port on the bottom-right. Wire it into a video node or a multi-ref generator and it expands into every image inside, in reading order.
Pair with aliases (see above) and a group titled @moodboard becomes a named bundle you can pull into any prompt.
Lock a node
Every node has a small padlock in its header. Click it and the icon flips from open to closed and turns yellow: the node is now frozen. You can still see it, wire from it and read it, but you cannot drag it, edit its fields or delete it by accident. Click the padlock again to unlock.
The idea is a master: once a character sheet, a location plate or a style reference is the one you want everything else to match, lock it. Combined with an alias — a group titled @character, #location or $style — the locked node becomes the source of truth for that name across the canvas. Every prompt that mentions the alias pulls from it, and it cannot slide out of place while you build the rest of the shot.
The selection toolbar
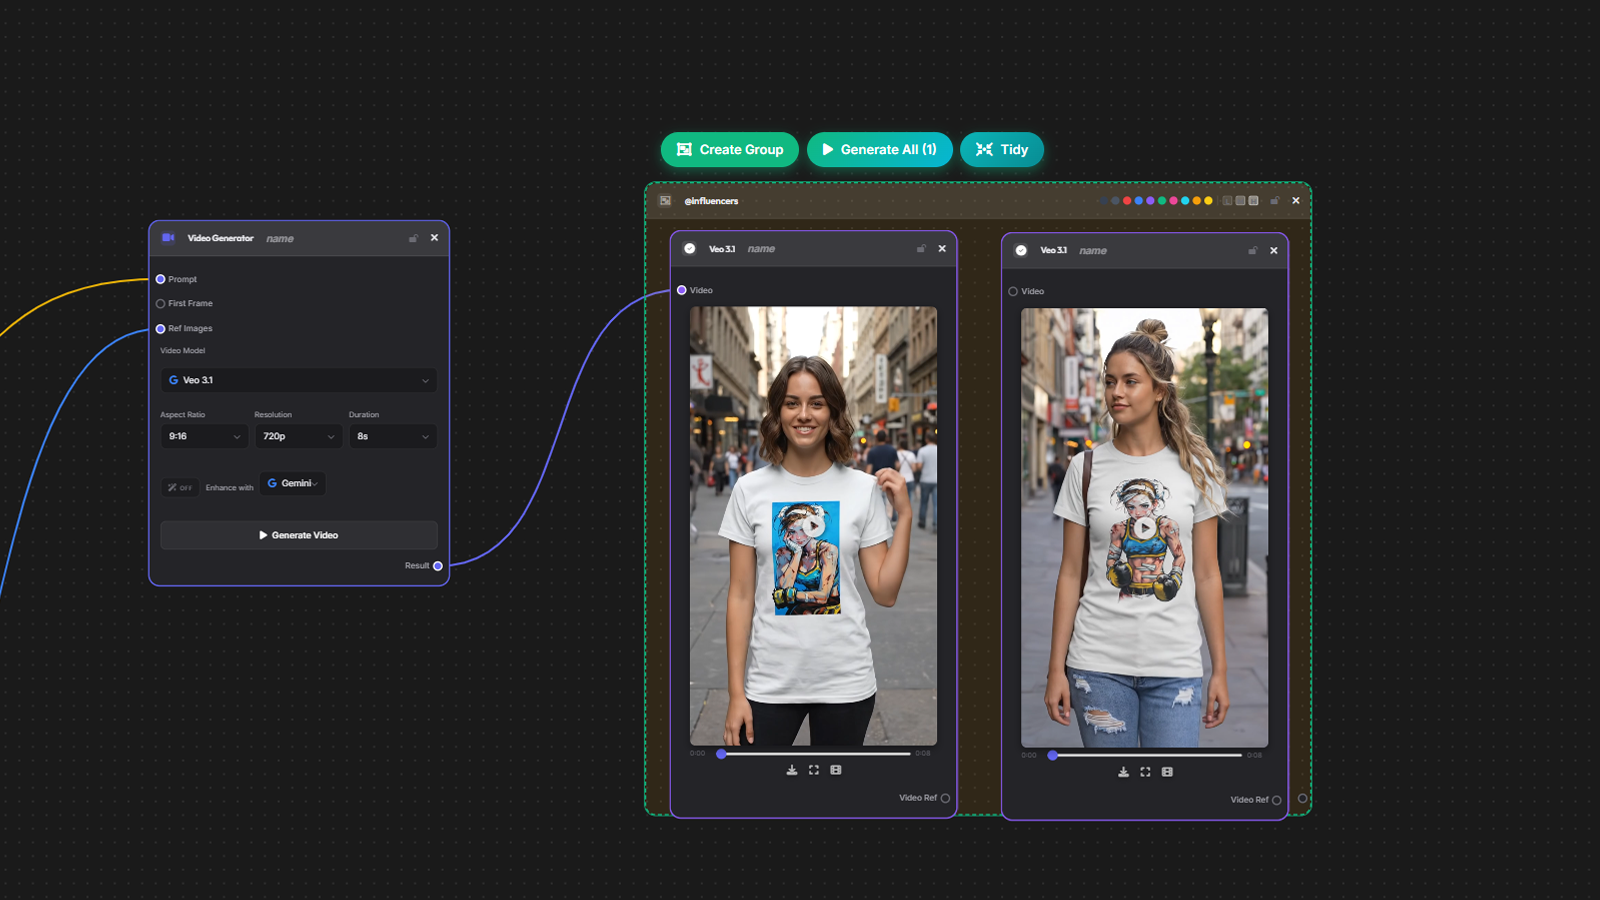
Select two or more nodes and a small floating toolbar appears above the selection. It exposes a few actions that all save you a copy-paste-arrange chore:
- Create Group — wraps the selection in a titled group. Use the title as an alias (@cast, #location, $style) to turn it into a multi-image reference.
- Make Grid — only shows when every selected node is an image. Lays them out in a tidy grid in place, ready to wire into a video node or a multi-ref generator.
- Generate All — only shows when the selection contains generator nodes. Runs every one of them in parallel. The number in brackets tells you how many will fire.
- Tidy — auto-arranges the selection in a clean grid, in selection order. Great when you have wired up ten messy nodes and want them lined up before screenshotting or grouping. Select a single group and Tidy rearranges its children instead, expanding the group's box if it has to.
The toolbar disappears as soon as you click anywhere else.
Notes
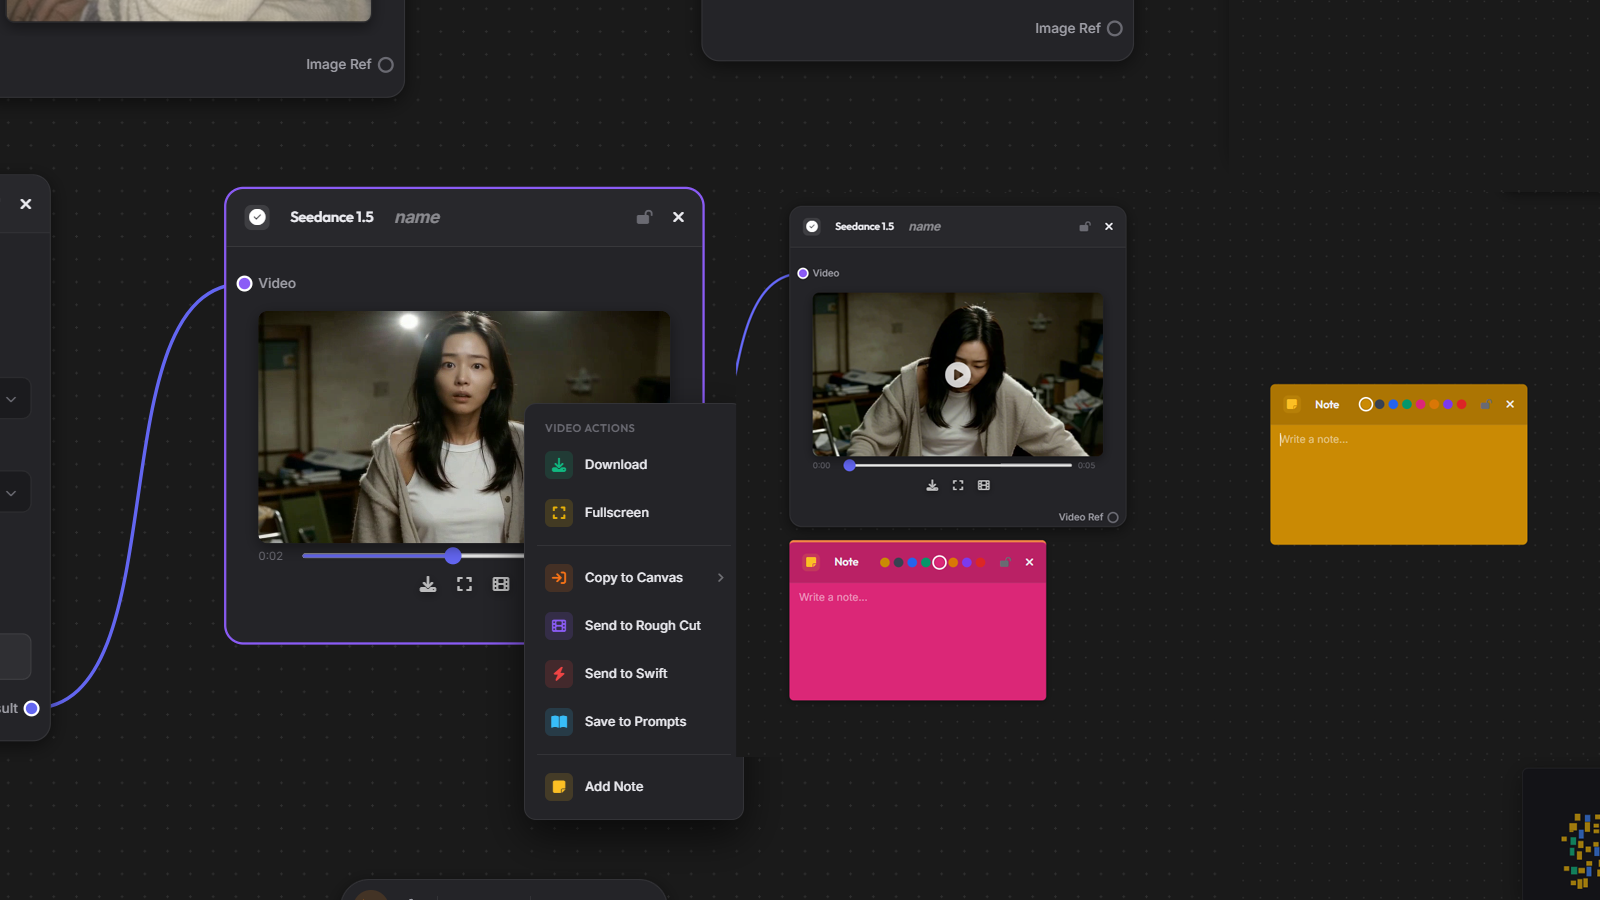
Sticky notes for everything that is not a prompt — a reminder, a TODO, a comment for the director, the seed that finally worked, the reason you picked one take over another. Coloured textareas with a palette of eight tints.
Free-floating notes
Right-click on any empty area of the canvas and pick Add Note. It lands where you clicked and you drag it wherever you want. Use it for ideas that belong to the canvas as a whole, not to a specific shot.
Linked notes
Right-click directly on a generated image or video and pick Add Note. This note is born with a yellow top border and is glued to its parent node — it sits right underneath and follows it wherever the parent goes. If the parent grows (auto-fit after a longer prompt), the linked note slides down automatically to stay below it.
Two things to know:
- You cannot drag a linked note on its own. Clicking it only selects it. To move the pair, drag the parent node.
- To break the link, delete the note and create a new free-floating one.
Typical uses: record the exact prompt that worked, note a version to revisit, park a director's comment next to the take they reacted to.
Media actions
Right-click on any image or video in the canvas and you get a context menu of everything you can do with that media:
- Download / Copy / Fullscreen — save to disk, copy to clipboard, view large. Downloaded images and videos carry their prompt, model and settings inside the file (switch it off in Profile → Downloads).
- Copy to Canvas — send a copy of the media to any other canvas in your projects, picked from a submenu.
- Send to Edit / Rough Cut / Swift / Stage — jump the media straight into another mode: open it in the Image Editor, drop it on the timeline, use it as a Swift reference, or stand it up as a 3D standee.
- Save to Prompts — generated media carries its prompt; this saves that prompt to your Prompt Library in one click.
- Separate Grid — got a 2×2 or contact-sheet image? This slices it into individual image nodes.
- Replace Image, Add Note — swap the file in place or pin a note to it.
Two of these deserve a closer look because they open up production tricks you would otherwise need a separate tool for.
Convert GIF to Video
Right-click on an animated GIF and a Convert GIF to Video option appears. It only shows up when Kubock detects real animation (by reading the file's frame blocks), so it never clutters the menu for static GIFs or regular images.
Click it and the GIF is converted to an MP4 entirely in your browser using FFmpeg — nothing is sent to a server for the conversion. The resulting video node lands on the canvas next to the original, ready to drop into the Rough Cut timeline, use as a video reference, or chain into any other video operation.
Why this matters: animated GIFs are a classic source of looping motion (reaction shots, cycle animations, references scraped from the web) but most editing and AI tools need real video files. This turns them into usable MP4s in one click.
Extract Last Frame
Right-click on any video in the canvas and pick Extract Last Frame. Kubock grabs the final frame of the clip (one frame before the absolute end, to avoid the black frame some encoders put at EOF), uploads it, and places an image node right next to the video.
The point is continuity. Wire that new image into the First Frame input of another video node and the next generation starts exactly where the previous one ended — no jump cut, no drift in character design, no re-describing the scene. Chain several of these together and you can stitch a long sequence out of short AI-generated clips without visual seams.
Pairs well with image-to-video models like Kling, Veo or Hailuo that honour a first frame strictly.
The fullscreen viewer
Double-click any image or video on the canvas, or pick Fullscreen from its right-click menu, and it opens filling the screen. The ✕ or a click on the backdrop closes it.
Step through a node's takes without closing it. When the node behind the viewer holds more than one generation, arrows appear on both sides: click them, press ← and →, or spin the mouse wheel. They walk the same history as the ‹1/4› chevrons in the node header, so the node on the canvas follows along: close the viewer and you are left on the take you were looking at, ready to wire it into the next shot. They fade at either end instead of wrapping around, and they stay hidden when there is nothing to step through.
The buttons act on whatever is on screen: Download, Copy (the image itself, or the URL for a video) and Send to Rough Cut. On a video you also get Capture Frame: scrub to the exact frame you want, hit the camera, and it becomes a new image node right next to the video. That is how you pull the one frame where the expression finally landed, ready to feed the next generation. From Swift the same button drops the frame onto the prompt bar as a reference instead.
Pin canvases to the top
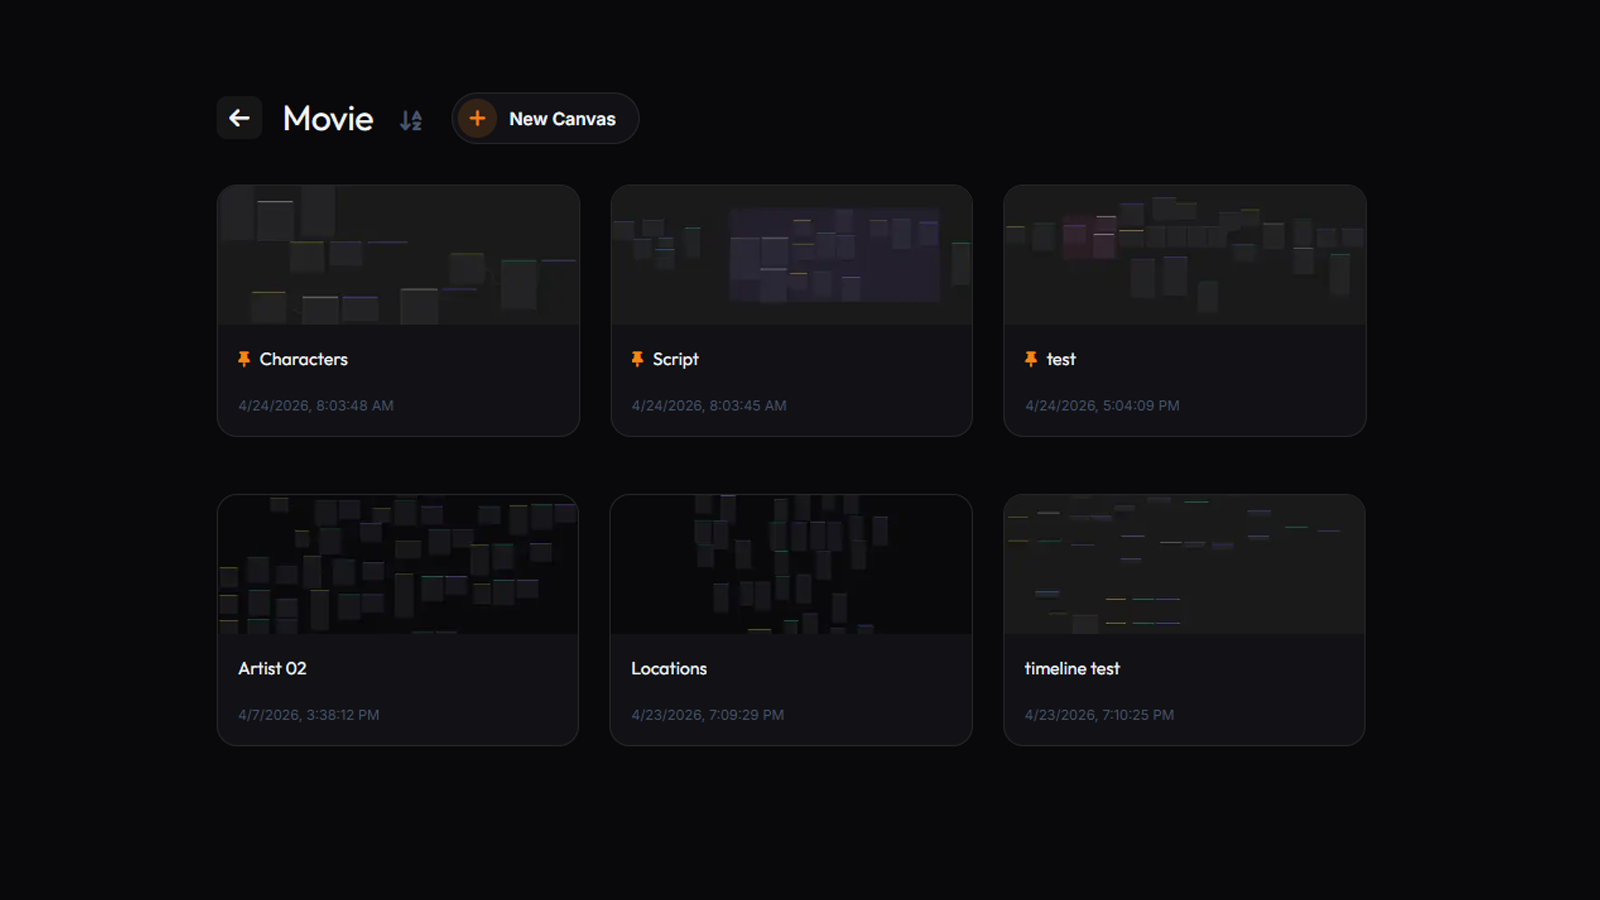
In a project with many canvases, the ones you are actively working on get buried fast. Open the three-dot menu on any canvas card and pick Pin to top. Pinned canvases float above the rest, in pin order, with an orange thumbtack next to their name so you can spot them at a glance. Pick Unpin to put a canvas back in the normal flow.
Pinning is per-project and saved on the server, so it follows you across devices.
Favorites
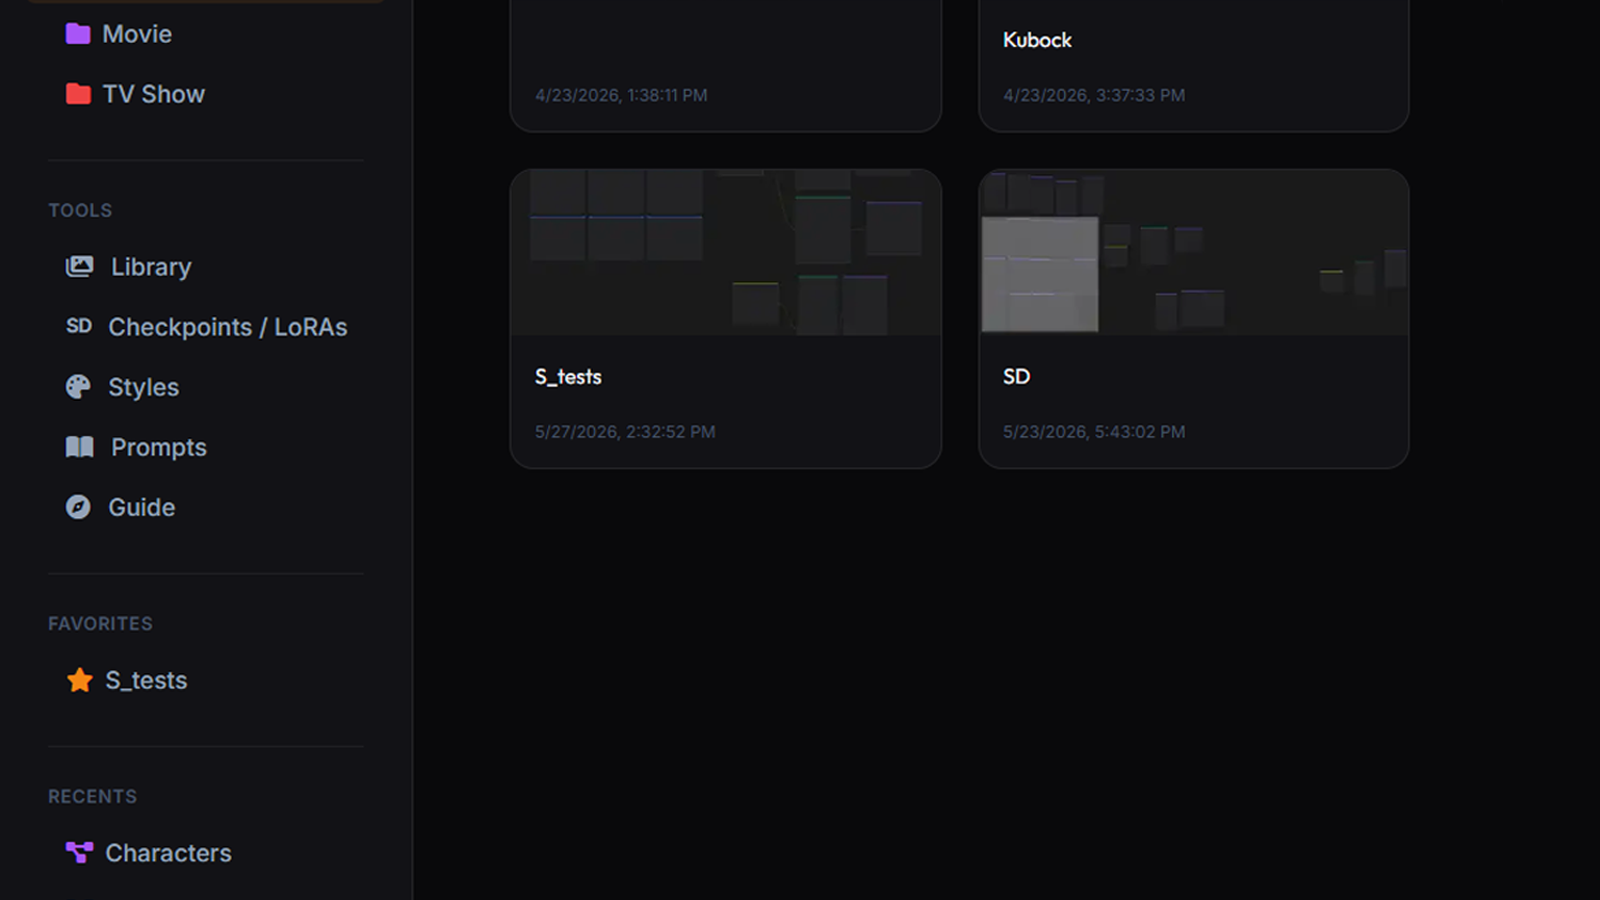
Pin to top is great inside a project, but sometimes you want a canvas accessible from anywhere in the app — the master shot list, the character bible, the timeline you keep reopening. That is what Favorites is for.
Open the three-dot menu on any canvas card and pick Pin to Favorites. The canvas appears in the Favorites section of the sidebar, available from every dashboard page (home, library, LoRAs, etc.). Pick Unpin from Favorites to remove it. Up to 20 favourites at a time.
Favorites are stored per device — they do not follow you across browsers or machines. Use Pin to top inside a project if you want something synced.
A Recents section right below shows the last five canvases you opened, also per device, so a canvas you visited five minutes ago is one click away even if you forgot to favourite it.
Wrapped
When a production wraps, its project should stop cluttering your home screen — but you never want to delete it. Open the three-dot menu on a project card and pick Send to Wrapped. The project moves out of the main grid into a Wrapped shelf below it, folded away but fully intact: every canvas, every asset, one click away.
Pick Back to Production on a wrapped project to bring it back to the grid. Nothing is archived away from you — wrapped projects open and work exactly like active ones.
The lookup shelf: every keyboard shortcut in one place, and how autosave quietly keeps your work safe.
Keyboard shortcuts
From outside a canvas — the Library, LoRAs, Prompt Styles and so on — Shift+F1 through F8 teleport you back to the last canvas you worked on, opened in the mode you pressed. Shift+F9 through F12 always go to the sidebar pages.
Switch modes
Add nodes at the cursor
Canvas
Undo and redo also work inside the Image Editor and Rough Cut.
Stage
On the timeline (the dope sheet or the ruler), click a keyframe to select it and drag to re-time it. Shift+drag draws a box that picks several at once, Shift+double-click grabs them all, and dragging any one moves the whole group. Middle-mouse drag a key to copy it to another frame, or middle-drag an empty spot to drop a key with the interpolated pose from there. Right-click a key for copy / cut / paste / paste relative / delete.
Rough Cut
Prompts
Saving & autosave
You do not need to press save. Kubock autosaves the canvas continuously — on every node add, delete, drag, resize and connection. It also saves the moment a generation finishes so an F5 never eats your last result.
Names, project settings and library changes sync as soon as you stop typing. Your work follows you across devices.
Kubock ships faster than these docs. If something in here doesn't match what you see, or you hit a rough edge, tell us— that's how it gets better.
Still stuck? Drop us a line.